It takes a child six years to be able to balance on one leg for up to 10 seconds, hop on one foot, albeit clumsily, or learn how to ride a bike without training wheels. It takes a lot longer to master standing on one leg with the other leg pointing behind and lifted high in the air (called an ‘arabesque’ in ballet), or to be able to twist and swivel while pitching a baseball.
To have good balance, what the Merriam-Webster dictionary defines as “the ability to move or to remain in a position without losing control or falling”, requires a lengthy process, during which the brain learns to control the different parts of the body, the timing of each movement and its relationship to the rest of the body. In other words, balance is not a ‘thing’ – there’s nowhere that a ‘balance’ can be found. What we call ‘balance’ is the successful outcome of continuous, highly dynamic and complex brain activity.
As Robynne Boyd summed up in her 2008 interview with John Henley, a neurologist from Mayo Clinic, reported in Scientific American: “In walking toward the coffee pot, reaching for it, pouring the brew into the mug, even leaving extra room for cream, the occipital and parietal lobes, motor sensory and sensory motor cortices, basal ganglia, cerebellum and frontal lobes all activate. A lightning storm of neuronal activity occurs almost across the entire brain in the time span of a few seconds.”1
We all have had to learn how to move our bodies in space, and how to maintain balance throughout the trajectory of any movement that we’re performing, to successfully fulfill what we set out to do each time we want to move. That’s true for seemingly simple actions like reaching for a glass of water to more challenging actions, like walking along a steep narrow trail, roller-blading or carrying a tray loaded with champagne-filled flutes.
Our bodies are built such as to almost fall at all times when we’re upright. We have a narrow base, a high centre of gravity and a heavy head at the top. The good news is that it makes initiating any movement very easy and allows us great freedom to move in all directions with a remarkable number of variations. On the other hand, the brain has the enormous task of constantly making sure we don’t lose balance as we move.
Rising numbers of falls
Increased susceptibility to falling is one of the most serious problems associated with ageing. Approximately one-third of people aged 65 years and over in America fall at least once a year, with up to one-fifth of them suffering multiple falls. Poor balance is the cause of the majority of falls in older adults, and falls are the leading cause of injury-related death and hospitalization in people aged 65 years and over.2
Yet, with the current life expectancy being around age 80 (and, for many, into the 90s and even 100s), 65 is not even especially old.
And it’s not only older adults whose ability to generate and maintain balance is deteriorating. Joan Vernikos, PhD, former chief of NASA’s Life Sciences Division, points out that even people in their 20s are beginning to show signs of diminished balance.3
Children, for whom the process progresses in the opposite direction – they evolve from having no ability to balance when they are born to becoming independently moving adults – are constantly moving, and their brains have to continuously negotiate the gravitational field. This leads to a vibrant process of differentiation – the creation of new connections and their integration – in the brain, as new and increasingly more complex and more refined skills develop.
Adults, on the other hand, tend to sit for long hours at a time. Even when participating in fitness programmes, the activity often places a greatly diminished demand on the brain to negotiate the pull of gravity. Some examples are using stationary bikes and lifting weights
while sitting.
Over time, as people age their stance tends to get wider, they shuffle their feet when walking, and their whole body become progressively more rigid, indicating a loss of differentiation in the brain. They move as one block, trying to achieve stability and safety by actually inhibiting movement – the kind of stability a table or chair has.
With younger people, the gradual deterioration of balance, or an insufficient development of balancing skills in the first place, can reduce the motivation to move and try doing new things. This tends to stifle continued learning, vitality and joy, and may limit life unnecessarily.
For older adults, fear sets in because they feel they cannot manage unexpected changes effectively. This sets up a vicious cycle in which reduced movement and reduced brain activity begets further reduced mobility, leading to loss of neural connections and further loss of the ability to balance and control movement.
An important part of what’s necessary to have good balance is for the brain to sense and feel where the body is in space and how it relates to its environment. Research shows that peripheral sensation seems to be the single most important factor in the maintenance of static postural stability.4
In fact, one of the reasons why older adults begin falling is because they are no longer able to quickly and clearly feel sensations coming from the soles of their feet. These sensations inform the brain about the ground surface and any changes in the surface they are stepping on. Without this information, the brain can’t make adjustments to the body to ensure maintaining balance.
The good news is that the common deterioration described above is reversible, and even those who are athletic and have good balance can become even better.5 At any age and under the right conditions, the brain can restructure itself and change for the better – with what is called ‘neuroplasticity’.
In one study, neuroscientists at the University of California, San Francisco were able to identify more than 20 age-related cortical processing deficits in old vs young rats. Yet, after training using an ‘oddball’ discrimination task (to activate the process of differentiation in the brain), they observed nearly complete reversal of most of the previously noted functional and structural brain impairments, including balance deterioration.6
These findings suggest that the majority of these age-related brain changes are, by their fundamental nature, reversible – at least in rats.
Although humans may process things differently, the evidence nonetheless suggests that we can recover function with the right movement training.
The following NeuroMovement® lessons can provide your brain with the conditions and information it needs to improve your balancing skills and begin reversing, right away, any deterioration you may already have.
Note: For the best outcomes, make sure to do the movements slowly and gently, with as little force as possible, and pay close attention to what you feel as you move.
Lesson 1
On Hands and Knees – Head, Spine and Pelvis
1) Lie on your back, on a firm but comfortably padded surface. Scan the contact of your body with the floor.
2) Come onto all fours on your hands and knees. Slowly start moving your pelvis back towards your heels as if you are going to sit on your heels, then return to your original position. Repeat this movement four to five times.
3) Still on your hands and knees, now round the spine and look down towards your tummy and the arch your back and look up straight ahead of you. Repeat four to five times.
4) After a moment’s pause, move your pelvis back towards your heels as if you are going to sit on your heels and return to your original position. Is the movement any easier?
Lie on your back and rest and notice if you feel any changes in your contact with the floor.
5) Come on all fours and slowly, starting with a small movement, slide your left knee
down, and in an arc to the right, with a view to eventually bringing the right side of the pelvis to the floor on the right side. Repeat this movement
four to five times, each time
with less effort.
Rest for a moment and then repeat this movement on the other side by sliding the right knee down and in an arc with a view to eventually bringing the left side of the pelvis to the floor on the left side. Repeat this movement four to five times.
Once more lie on your back and rest. Notice if you feel any changes in your contact with
the floor.
6) Sitting with your legs spread comfortably, extend your left leg fully along the floor and bend your right knee, keeping your right foot flat on the floor. Hold your right ankle with your left hand from in front and put your right hand in front of the right knee. Begin sliding the right foot on the floor towards the right buttock and the right knee towards the right shoulder. Repeat four to five times. Pause.
As you continue to slide the foot towards the pelvis, direct your right knee towards your left shoulder and back to place. Repeat four to five times.
Repeat this on the other side. Sit with your legs spread comfortably, with your right leg extended fully along the floor and the and left knee bent with the left foot flat on the floor. Hold your left ankle with your right hand from in front and put your left hand in front of your knee. Repeat four to five times, bringing the knee towards each shoulder. Then alternate, bringing the knee once to the left shoulder and once to the right shoulder.
Lie on your back and rest. Notice if you feel any changes in your contact with the floor.
7) Come back on your hands and knees. Move your pelvis back towards your heels as if you are going to sit on them once more. As you move back into your original position, notice if it is any clearer and easier than at the beginning of the lesson.
8) Begin sliding your left knee down and in an arc, with a view to bringing the right side of the pelvis to the floor. Repeat four to five times.
Then do the same thing, but on the other side, sitting on the left side and sliding the right knee down and in an arc. Repeat four to five times.
Now, carry out this movement on each side, but alternate from side to side. See if it gradually becomes one harmonious movement.
Rest on your back for one final time and again pay attention to any changes in the way that you lie on the floor.
Now, stand up and take a moment to notice if you feel any difference.

Lesson 2
Standing Behind Chair – Crossing Legs
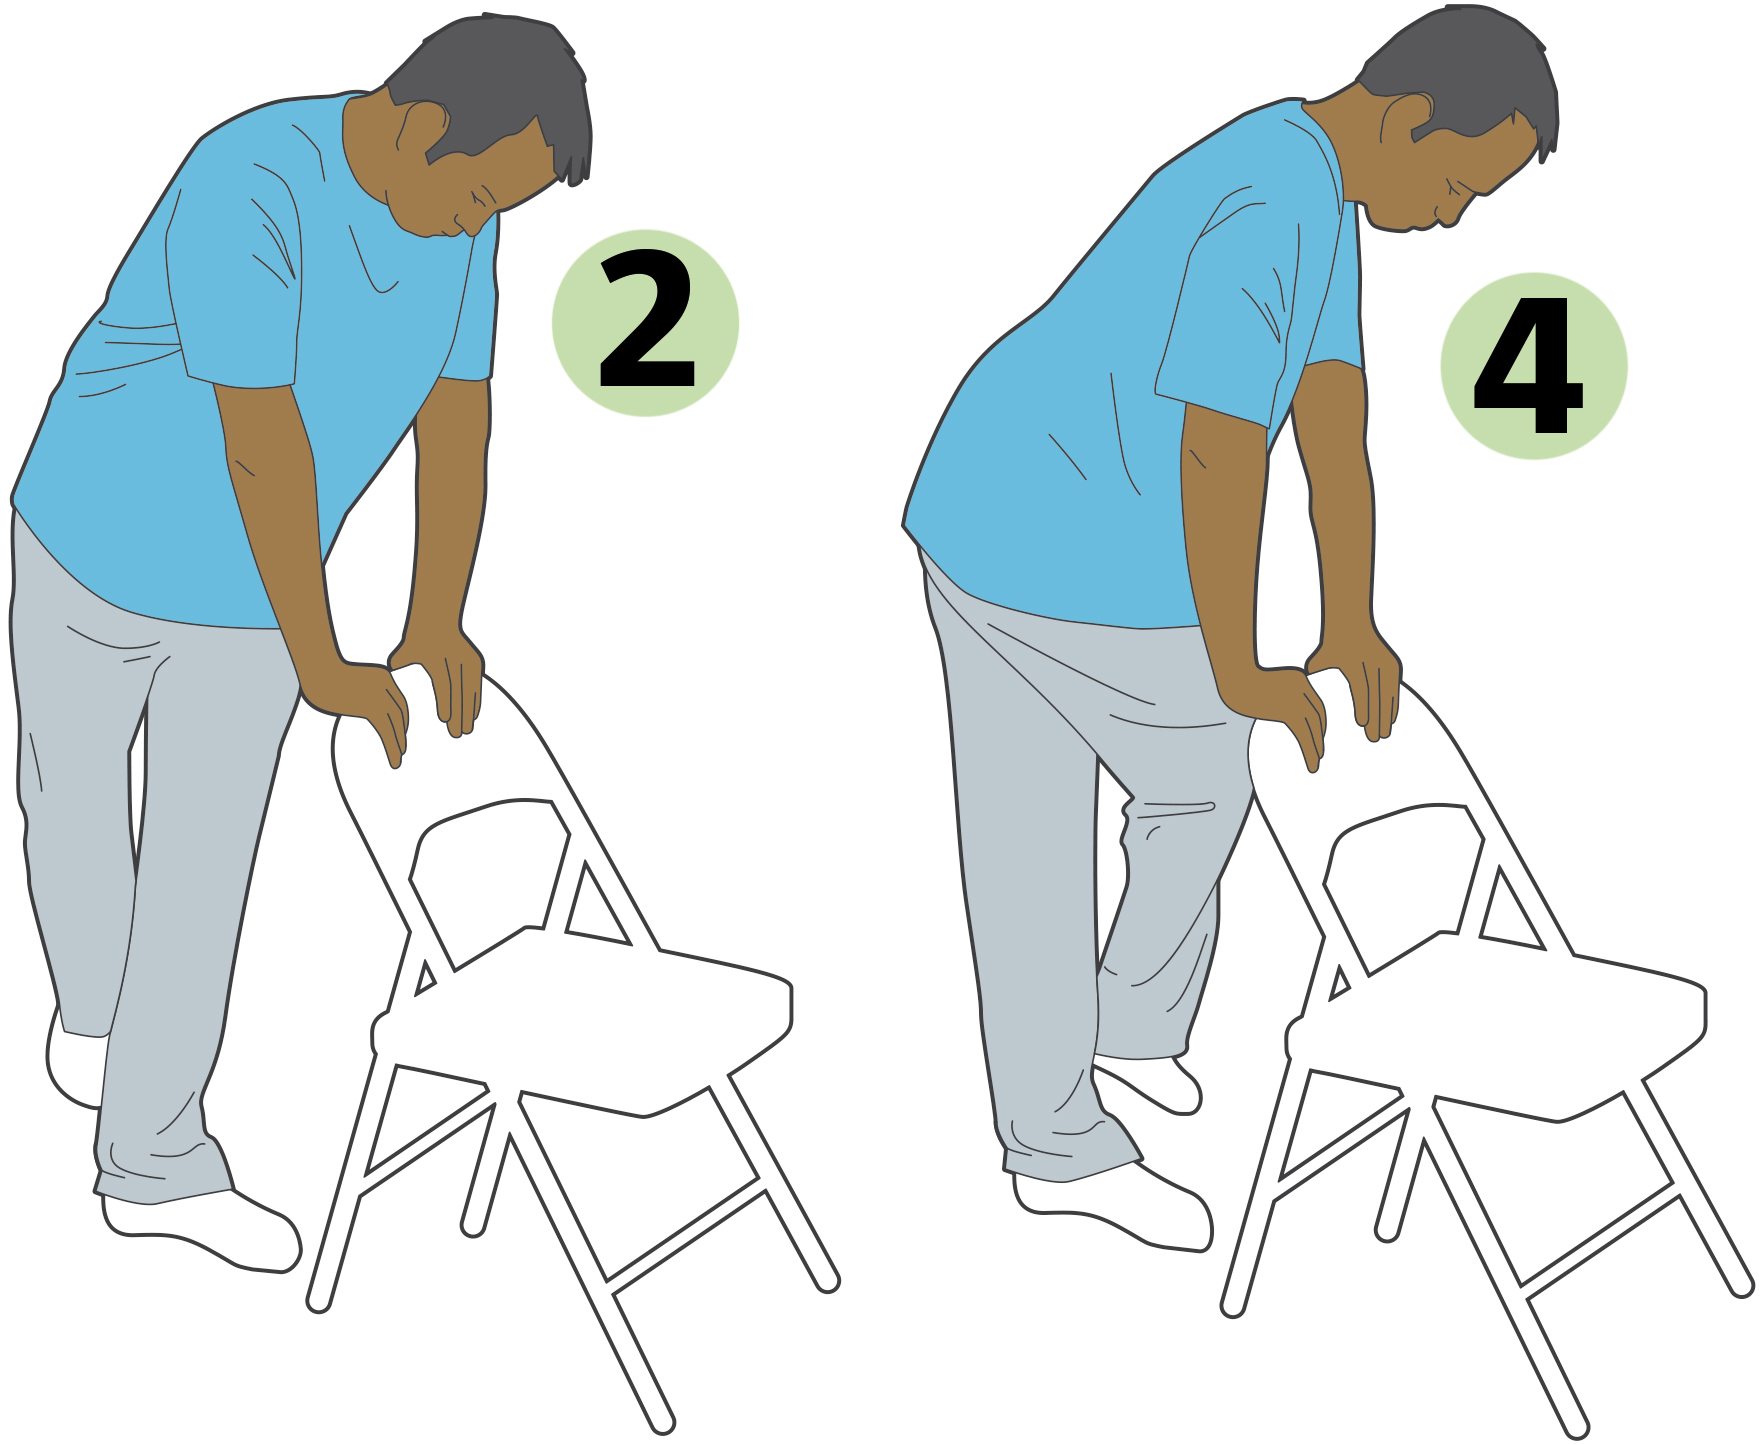
This lesson is done entirely standing. If you need to sit and rest during the lesson at any time, please do so. You will need a sturdy chair with a solid back that you can lean on with both hands comfortably spread.
1) Stand behind the chair, feet comfortably spread. Feel how you are standing. Slowly shift your weight delicately from one side to the other and pay attention to what you feel as your weight shifts from one foot to
the other.
2) Put your hands on the back of the chair and lean. Shift your weight onto your left leg and lift the right leg, bending the right knee and crossing it in front of the left leg. Put the right foot down on the outside of the left foot, put weight on it and then bring it back to place. Repeat this movement four to five times.
As you do the movement, allow your ribs and pelvis to move.
Rest in standing and walk once around your chair. Pay attention to any change you feel as you walk.
3) Stand behind the chair. Put your hands on the back of the chair and lean. Now cross your right leg behind your left leg. Put your right foot down, put weight on it and bring it back to place. Repeat this movement four to five times.
4) Now, cross your right foot once more in front of the left leg, put your foot down and, in one movement, pick up your right foot, bring it around behind the left leg and place your foot on the floor. Then in one movement bring it back in front, remembering to include your pelvis and ribs in the movement. Repeat four to five times. Rest.
5) Repeat instructions 3 and 4, but on the other side, crossing the left leg in front of the right leg and then behind it. Rest.
6) Stand behind the chair. Put your right hand on the middle of the back of the chair and lean on it, and place your left hand on your right shoulder. Lift your left leg and cross it in front of the right and return it to the original position. Repeat this movement four to five times.
7) Continue crossing your left leg in front of the right and bringing it back to the starting position. Each time you do the movement turn your head to look to the right. Repeat this four to five times.
8) Each time you take the left leg in front, take your head to the left and look left. Repeat four to five times. Rest.
9) Repeat variations 6, 7 and 8, but this time put your left hand on the middle of the back of the chair and lean on it, place your right hand on your left shoulder, then lift the right leg and cross it in front of the left. Then rest as you continue
to stand.
10) Again lean with your left hand in the middle of the back of the chair, lift your right arm forward, lifting it slightly, and look at it.
11) Cross your left leg behind your right leg and put the foot down, then cross it in front, as you continue to look at your outstretched arm. Repeat this four to five times.
12) Now change legs and cross the right leg behind and in front of the left leg looking at your outstretched hand the whole time. See if you can exaggerate the movement of your pelvis. Repeat this four to five times. Rest.
13) Now repeat 10, 11 and 12 but, this time, lean on the back of the chair with your right hand, lift the left arm in front of you, raising it slightly, and look at it as you carry out the movements with your legs. Rest.
14) Once more, lean on the back of the chair with both hands. Repeat the initial movements of this lesson, crossing your right leg in front and behind your left, and then left leg in front and behind your right leg. Have these movements become any clearer?
15) Stand and slowly shift your weight onto one foot while you lift the other off the ground with the knee bent. Has your balance improved?
16) Go for a walk around your room.

Lesson 3
Standing/Lying On One Leg
This lesson is intentionally done on one side only so that, at the end, you can feel the difference between balancing on one leg compared with the other.
Once you’ve done the lesson through to the end, though, you can repeat it on the other side using only your imagination. Get into the initial position for each variation, then just imagine doing the movement itself and experience the extraordinary power of your brain to learn.
1) Stand and pay attention to what you feel when you stand. Feel the relationship in the space between the different parts of your body. Notice where your head is in space relative to your shoulders and hips. Feel the pressure under your feet and notice if it’s more towards the ball or the heel of your foot.
2) Stand with your feet spread comfortably apart. Shift your weight onto the left foot and bend the right knee so that the heel comes off the floor and you’re resting on the toes of your right foot.
3) Return to standing with both feet fully in contact with the floor, then repeat the shift of weight to the left, bringing the right heel off the floor four or five times.
4) Now, very slowly, start lifting the right foot off the floor by lifting your knee straight out in front of you. Bring it back down and repeat the movement four
or five times. As you do this movement, try to remain tall and avoid leaning backward or bending to one side or the other.
5) After you’ve completed the movements, lie down on your back and rest.
6) While lying down, bend both knees and place both feet flat on the floor, then lift your right foot off the floor, knee bent, and hold your right leg, just below the knee from in front, with your right hand.
7) Gently bring your thigh towards your chest and return to a neutral starting place. Repeat this four or five times, then rest.
8) Still lying on your back, bend your knees with feet flat on the floor, and hold the right side of your thigh from the side with your right hand.
9) Lift the right leg, bent towards your chest as before, and hug your thigh, knee and shin as you bring the leg up. Start with a small movement and repeat four or five times. See if you can eventually hold your foot with your hand. Let the position of your leg determine where your place your hand. Rest.

10) Once more, still lying on your back, bend your knees with feet flat on the floor, and place both hands around your right thigh – right hand on the outside, left hand on the inside. Now lift the right leg, bent as before and hugging your leg with both hands,and bring it as far as you comfortably can towards your chest, then return to neutral. Repea tfour or five times, then rest.
11) Come up to standing. While standing, place the palm of your right hand on the outside of your right thigh and slowly lift the right leg, as before. As the leg comes up, hug your leg with a view towards eventually holding your foot in your hand. Stay tall as you do this and let the chest simply hang. Repeat four or five times, then rest while standing.
12) Still standing, place the palm of your right hand on the outside of your right thigh and the palm of your left hand on the inside of the right thigh. Slowly lift the right leg as before and, as the leg comes up, hug the leg with both hands with a view towards eventually holding your foot in your hands. Don’t try to do the full movement unless you can balance easily and remain tall throughout. Repeat four or five times, then rest while standing.
13) As you’re standing, simply shift your weight to the left foot and lift yourright foot off the floor, bringing the right knee, bent, up in front of you. How is your balance now?
14) Repeat this one or two times, moving slowly and paying close attention to what you feel as you do the movement. Come back to standing with both feet flat on the floor. Did you notice a difference between the contact of one foot with the floor and the other?
15) Now, just shift your weight slowly to the right and lift your left leg, bent in front of you, and notice if it feels different doing the movement on this side.
16) Finally, take a short walk around the room while paying attention to any differences between one side and the other as you walk.

Special offer for WDDTY magazine readers:
Receive one month of free access to Anat Baniel’s NeuroMovement® for the Busy Life (previously titled Desk-Trainer), and get access to 40 five-minute online NeuroMovement lessons on your computer or mobile devices that you can do to help keep your brain and muscles awake while you sit, and improve the way you move and feel (go to: www.anatbanielmethod.com).
Anat is also offering WDDTY readers FREE NeuroMovement lessons at: www.anatbanielmethod.com/wddty, plus a 20 per cent discount on all NeuroMovement DVD programmes by using the coupon SAVE20OFF.
To learn more about her online/DVD NeuroMovement for Whole Body Fitness, see: www.anatbanielmethod.com/members/neuromovement-whole-brain-body-fitness/.
And do tell her how you’ve got on with these movements at: facebook.com/anatbanielmethod
Main article
|
References |
|
|
1 |
www.scientificamerican.com/article/do-people-only-use-10-percent-of-their-brains/ |
|
2 |
www.neura.edu.au/health/falls-balance/?gclid=CNTZmbuw5M0CFQEJaQodc0MHfABalance |
|
3 |
Vernikos J. Sitting Kills, Moving Heals: How Everyday Movement Will Prevent Pain, Illness, and Early Death – and Exercise Alone Won’t. Sanger, CA: Quill Driver Books, 2011 |
|
4 |
Postgrad Med J, 2006; 82: 301–4 |
|
5 |
Sports Med, 2011; 41: 221–32 |
|
6 |
ProcNatlAcadSci U S A, 2010; 107: 13900–5 |
What do you think? Start a conversation over on the... WDDTY Community