
Physiotherapist Will Harlow, who specializes in helping over-50s stay mobile and active, shares his top exercises for relieving neck pain and stiffness as well as avoiding arthritis
The human neck is a wonderful and intricate invention, made up of seven cervical vertebrae, as many discs, and a network of nerves and blood vessels. It’s no wonder we’re always taught to be careful with our necks during sport and physical activity.
Even if you were to take good care of your neck throughout your younger years, you wouldn’t be guaranteed a healthy neck in the latter half of your life.
Many people suffer with age-related deterioration to the facet joints and discs that make up the moving parts of the neck. If left unchecked, these changes can lead to abnormal levels of pain and stiffness.
Thankfully, even for the stiffest of necks, a lot can be done to tackle the problem.
To provide a solution, the first thing to understand is what a normal pattern of neck movement looks like. Our necks have six “pure” movements available: flexion, extension, side flexion to the left and right, and rotation to the left and right (see exercise 1, below).
As we age, all six of these movements (but especially extension and rotation) can become restricted. The simplest way to regain movement of your neck is to practice each movement gently and repeatedly over time.
It’s incredible how much difference such a simple practice can make to neck mobility. If you have trouble looking up at things or notice stiffness when turning your head while driving, you’re a good candidate for this exercise.
Make sure you stick to only the pure neck movements when practicing. I often see people trying to combine these movements with rolling the neck from one ear to the other behind the shoulders, for example. These movements may actually make pain worse by pinching the facet joints.
The human neck is an incredible example of nature’s architecture at its finest. One of the most complex areas of the human body, the neck houses intricate bony structures, branches and bundles of nerves, and muscles that work both independently and as a unit.
Our necks tend to feel better if we sit and stand in a position that properly “stacks” all the structures within the neck on top of each other. Think of it like a game of Jenga: if you stack the blocks correctly, the tower is stable.
However, if you stack them in a rush, with some of the little wooden blocks skew-whiff, your tower is instead prone to stress and strain. Our necks are no different.
By stacking them correctly, we can minimize stress on the tiny joints in the neck. Unlike in Jenga, we can’t add or subtract the bones in our neck. However, we can change the pulling force on these bones by asking certain muscles to do the jobs they were designed for.
One reason we want to limit undue stress and strain on our intricate neck joints is because this helps prevent arthritis—the (natural or accelerated) wearing down of the cartilage within our joints.
If you’ve been told that you already have some arthritis in your neck, this need not always be cause for concern. The exercises I use to help people prevent arthritis are often the exact same ones I use to treat it.
The deep neck flexors are a group of tiny muscles located within your neck, under your chin. They are given the daunting task of supporting your head when you sit, walk and move.
To support the weight of the head (which is enormous in comparison to the size of these tiny muscles), it’s vital these muscles are strong and durable enough to do their job well.
So, how do we know whether these tiny muscles are working properly? If you find the back of your neck aches after you’ve been driving, or you notice your chin pokes forward when you sit or walk, it’s likely the deep neck flexors aren’t doing their job very well.
You might also notice a “compressed” feeling at the back of your neck, as if something is being trapped or crushed there. That feeling may be the weight of your head straining the neck joints, which should be prevented by the deep neck flexors.
If left untreated, the continuous pressure can cause problems down the line. But this is solvable. The chin tuck exercise (see exercise 2, below) is a fantastic way to resolve this “crushing” sensation at the back of the neck, helping with neck pain, headaches and stiffness.
It’s a subtle exercise that doesn’t require much effort, just plenty of regularity. Lots of my patients find they can happily get on with it in front of the TV or in the car.
Poor posture is simply a position that’s suboptimal for the performance of a given task, whether it’s sitting, standing or walking. This requires assessing posture in the context of the task at hand.
To make matters more complicated, we’re all built differently. Some have long legs and a short body, while others have long spines or even a leg-length difference. This means everyone’s “perfect posture” is completely different for any given task.
That being said, some general rules apply to all. It makes sense to sit and stand in a way that puts the least stress on our joints and muscles. By following a set of principles that apply to almost all of us, we can minimize stress and strain on the body over time.
One way to do this is to assume the position that minimizes gravity’s strain on the body. As mentioned earlier, the detrimental effects of gravity are minimized when the spine’s vertebrae are stacked on top of one another.
If we ignore this principle, we can get into trouble. If we sit or stand in a way that positions the head in front of the shoulders, gravity pulls the head downward, putting the muscles at the back of the neck under immense strain to resist it.
If our shoulders are rounded, the curvature of the spine is exaggerated and gravity acts more harshly on the spinal joints. These are just two examples of how subtle postural changes can increase mechanical stress over time.
Now that almost all of us use computers, laptops, tablets and phones every day, we spend a huge proportion of our day looking at the gadget in our hands or on our laps. It encourages us to poke our chins forward as we strain to see small print and to round our shoulders as we use our hands to type.
These subtle postural changes take our neck and shoulders out of alignment, putting undue stress on weaker muscles. It’s no wonder that people who work in office jobs or spend a lot of time on social media are far more likely to suffer neck pain than their more active counterparts.
When we get up after a prolonged laptop session, the muscles that shortened during that time don’t automatically return to their normal length. This means we tend to remain in this new, poor posture long after we put the gadget down.
The first step to correcting this issue is simply to be aware that it’s happening. Once you’re aware of it, you can ask yourself, “Are my shoulders tipped forward and rounded? Is my chin poking forward?”
Sometimes my clients realize their posture has become a problem only when they catch their reflection in a shop window.
Thankfully, if you’ve noticed your posture has slipped, there are subtle yet effective changes you can make to take the pressure off these key areas again. Here are two great visualizations to help you do this.
Visualization 1
Imagine your sternum (the bone in the middle of your chest) is a full glass of water.
When you walk around with your shoulders rounded, your sternum tends to tilt forward, spilling water from this imaginary glass down your front.
To stop the spillage, slightly pull your shoulders back and push your chest out a little. Notice how your sternum tilts back—it should be perfectly upright now, and the water will stay in the glass.
Use this visualization whenever you get up after using your gadgets.
Visualization 2
Imagine a piece of string attached to the top of your head. Picture what would happen if a magical force from above pulled on the string to make you as tall as possible. You’d feel yourself grow an inch, your chest would rise and your shoulders would pull back slightly.
For most people, this is an excellent posture to maintain while walking, taking pressure off the neck and mid-back. The slight tweaks can offer an effective solution to pain in these areas.
It isn’t just the neck that gets stiff from sitting. Another part of the body suffers even though it doesn’t complain as much: the mid-back, or thoracic spine.
Many people don’t know that this area has a problem. But just because there isn’t pain there doesn’t mean it isn’t incredibly stiff. And stiffness in the thoracic spine is a big problem for the rest of the body.
First, the mid-back is the region of the spine that allows you to twist. There isn’t much rotation available at your lower back, so even though you may feel like you’re rotating there when you turn your torso, 90 percent of that movement is coming from the middle of your spine.
When the thoracic spine loses the ability to rotate, the lower back picks up the slack. The problem is the lower back is now being asked to do a job it wasn’t designed to do, causing increased stress in this area. This is why problems with the thoracic spine can contribute to lower back pain.
Second, there’s another vital movement of the mid-back called extension (leaning back). Being able to extend from the thoracic spine allows us to walk and stand without putting too much pressure on other areas of the body.
But most people have lost the ability to extend through the thoracic spine. This is most common in desk workers and others who sit a lot.
Being in a seated position increases the curvature in your thoracic spine, placing you in a flexed-forward position. Flexing forward is the opposite of extension, or leaning back, so if we spend our days locked in flexion, when we try to extend the thoracic spine, we often find we’ve lost the ability to do it at all.
The old saying is true: if you don’t use it, you lose it. When we lose this ability, other areas need to pick up the slack—and the neck draws the short straw. This is why neck pain often stems from a stiff mid-back rather than a problem with the neck itself.
So, how can your mid-back become so stiff all of a sudden? The truth is, the process is not very sudden at all. It happens over a period of years, and the sitting position tends to be responsible for much of this disastrous loss of movement.
Luckily, all is not lost, even if you’ve spent half your life working an office job. The solution is to improve the two movements most people have lost: thoracic rotation and extension.
The two-minute seated-rotation routine (see exercise 3, below) will help many with thoracic back pain as well as those who suffer from neck pain and stiffness.
Headaches are an incredibly common problem; 95 percent of people suffer from one at some point in their life. In fact, on any given day, 11 percent of men and 22 percent of women are suffering from a headache.1
For some, this pain can occur daily and be extremely debilitating. For those with frequent headaches, my first thought is to help them identify the underlying cause. I would start by asking them to explain the characteristics of their headache.
Is it like a tight band around the head? Does it affect only the back of the head, or the whole head? Does it feel like a pulsating pain behind the eyes? Or is it more of a continuous ache?
All of these questions can help to pinpoint the root cause of a headache (which is paramount to treating it). Many headaches in adults are caused by problems in the neck; these are known as cervicogenic headaches.
Have you ever suffered from a stiff neck with pain radiating up into the back of your head? If you have, you know just how unpleasant a headache like this can be.
You can also suffer from cervicogenic headaches without any neck pain whatsoever. This can make it hard to tell whether the neck is responsible or the culprit is something else entirely. Here are a few clues that can help you identify a neck-related headache:
The cause of these neck-related headaches is usually either that the muscles in the neck are too tight or that the joints aren’t moving as well as they should. These “mechanical” issues can be caused by several factors. Arthritis, muscle strains and whiplash can all cause cervicogenic headaches, too.
Be sure to get any new persistent headache assessed by your doctor first, but here are some top tips to help with this problem at home.
Check for other causes. Dehydration, hormonal problems and vitamin deficiencies can all cause headaches. It’s worth getting a thorough examination (possibly including blood tests) before you go any further.
Keep your neck mobile. The stiffer it gets, the worse the headache. Moving your neck might initially make the pain a little worse, but it should get better in the long run with some gentle movement within a comfortable range.
Apply heat. Using a warm compress to the back of your neck for 15 minutes at a time (be sure to protect the skin) can help to ease tight muscles and loosen stiff joints. Even if the pain is only in the head, this will often still help.
Try towel-assisted rotation. This exercise (see below) can relieve pain and restore the range of motion in your neck, if it’s safe for you to do it.
Check your sleeping position. If you’re lying on your side, your neck and head should align with your shoulders as if you were upright. Experiment with an extra pillow or take one away, if you currently use more than one, to see if that improves matters.
Sometimes getting a new pillow is a good idea. If you sleep on your back, use a supportive pillow and a rolled towel to support the head and neck (see image, below).
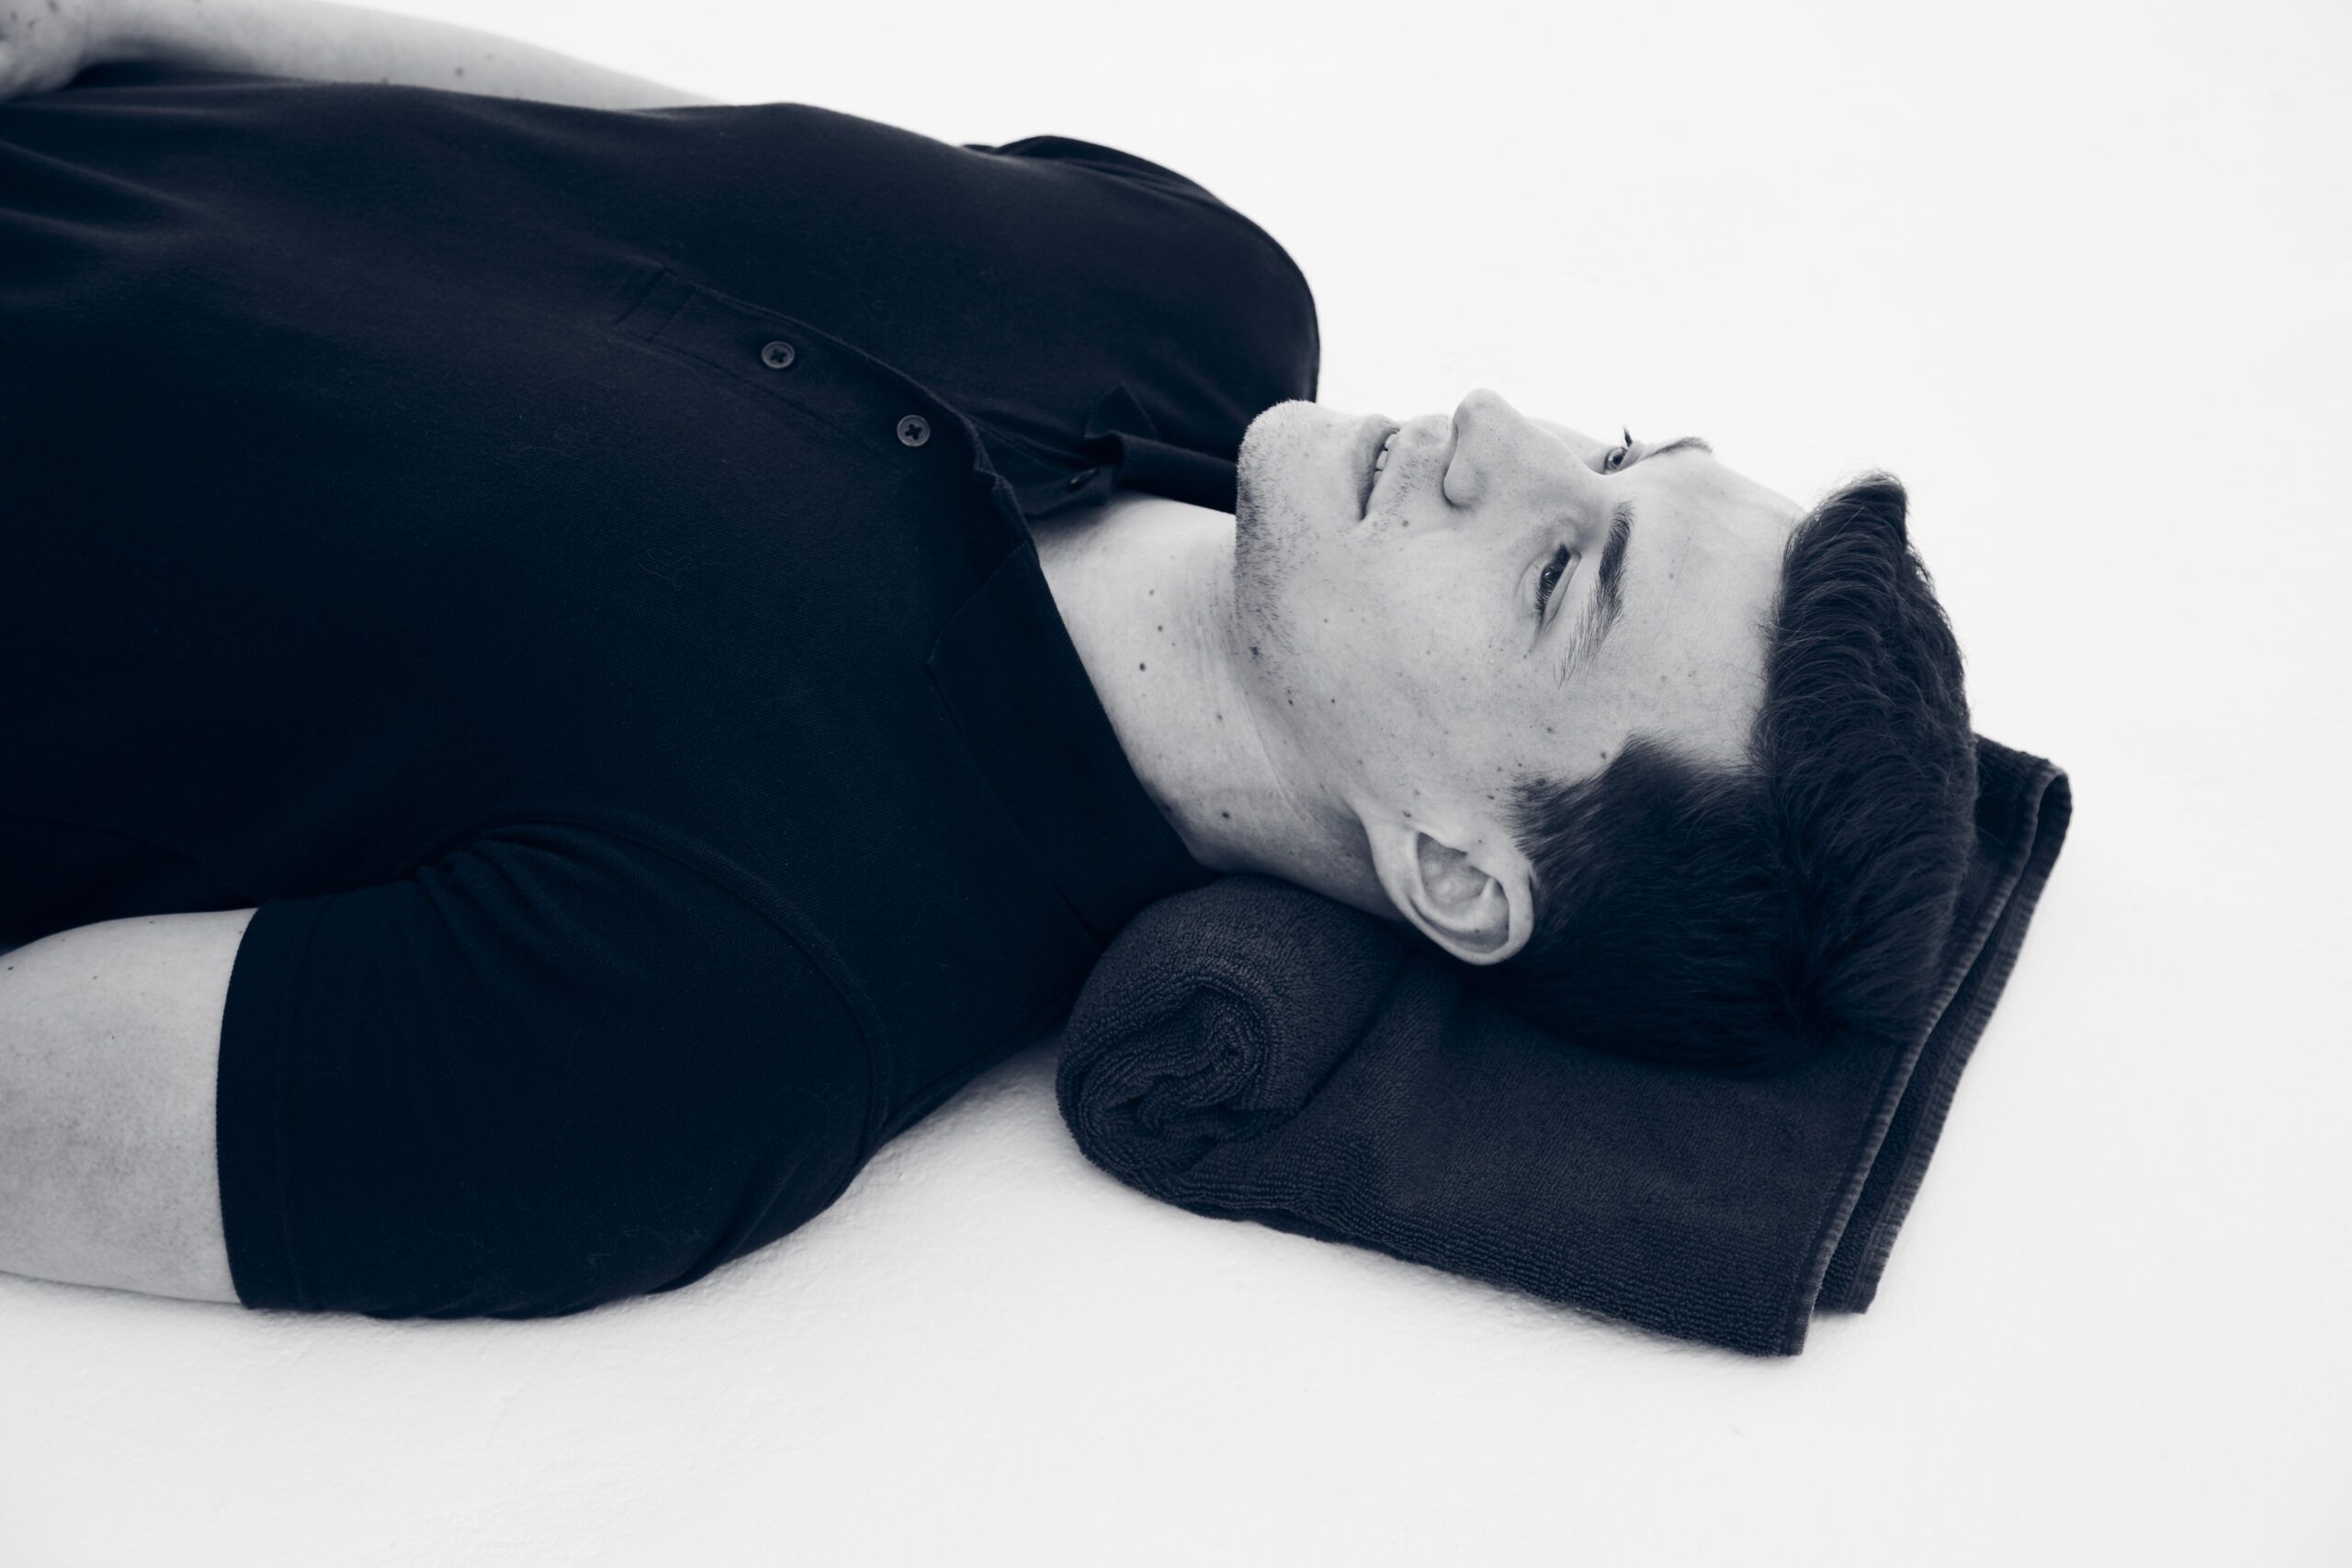 How to sleep on your back: This resting position is ideal for maintaining the natural curve in your neck
Watch your posture. By gently pulling your shoulder blades back and down when you sit (rather than rounding your shoulders) you can often relieve some of the stress on tired neck muscles and improve your headaches as a result. Try to imagine your lower back, mid-back, shoulders and head stacked and balancing there when you’re sitting still.
Far more important than sitting in the “correct” posture is not spending too long in any one posture. Try to get up and move or change positions regularly.
6 movements for a healthy neck
You only need to hold these positions for a couple of moments—it’s not necessary to push into uncomfortable ranges of motion. For the stiffer areas of your neck, perform the movements within a comfortable range, about 10 times in a row, three times per day.
1. Flexion: Gently tilt your head forward
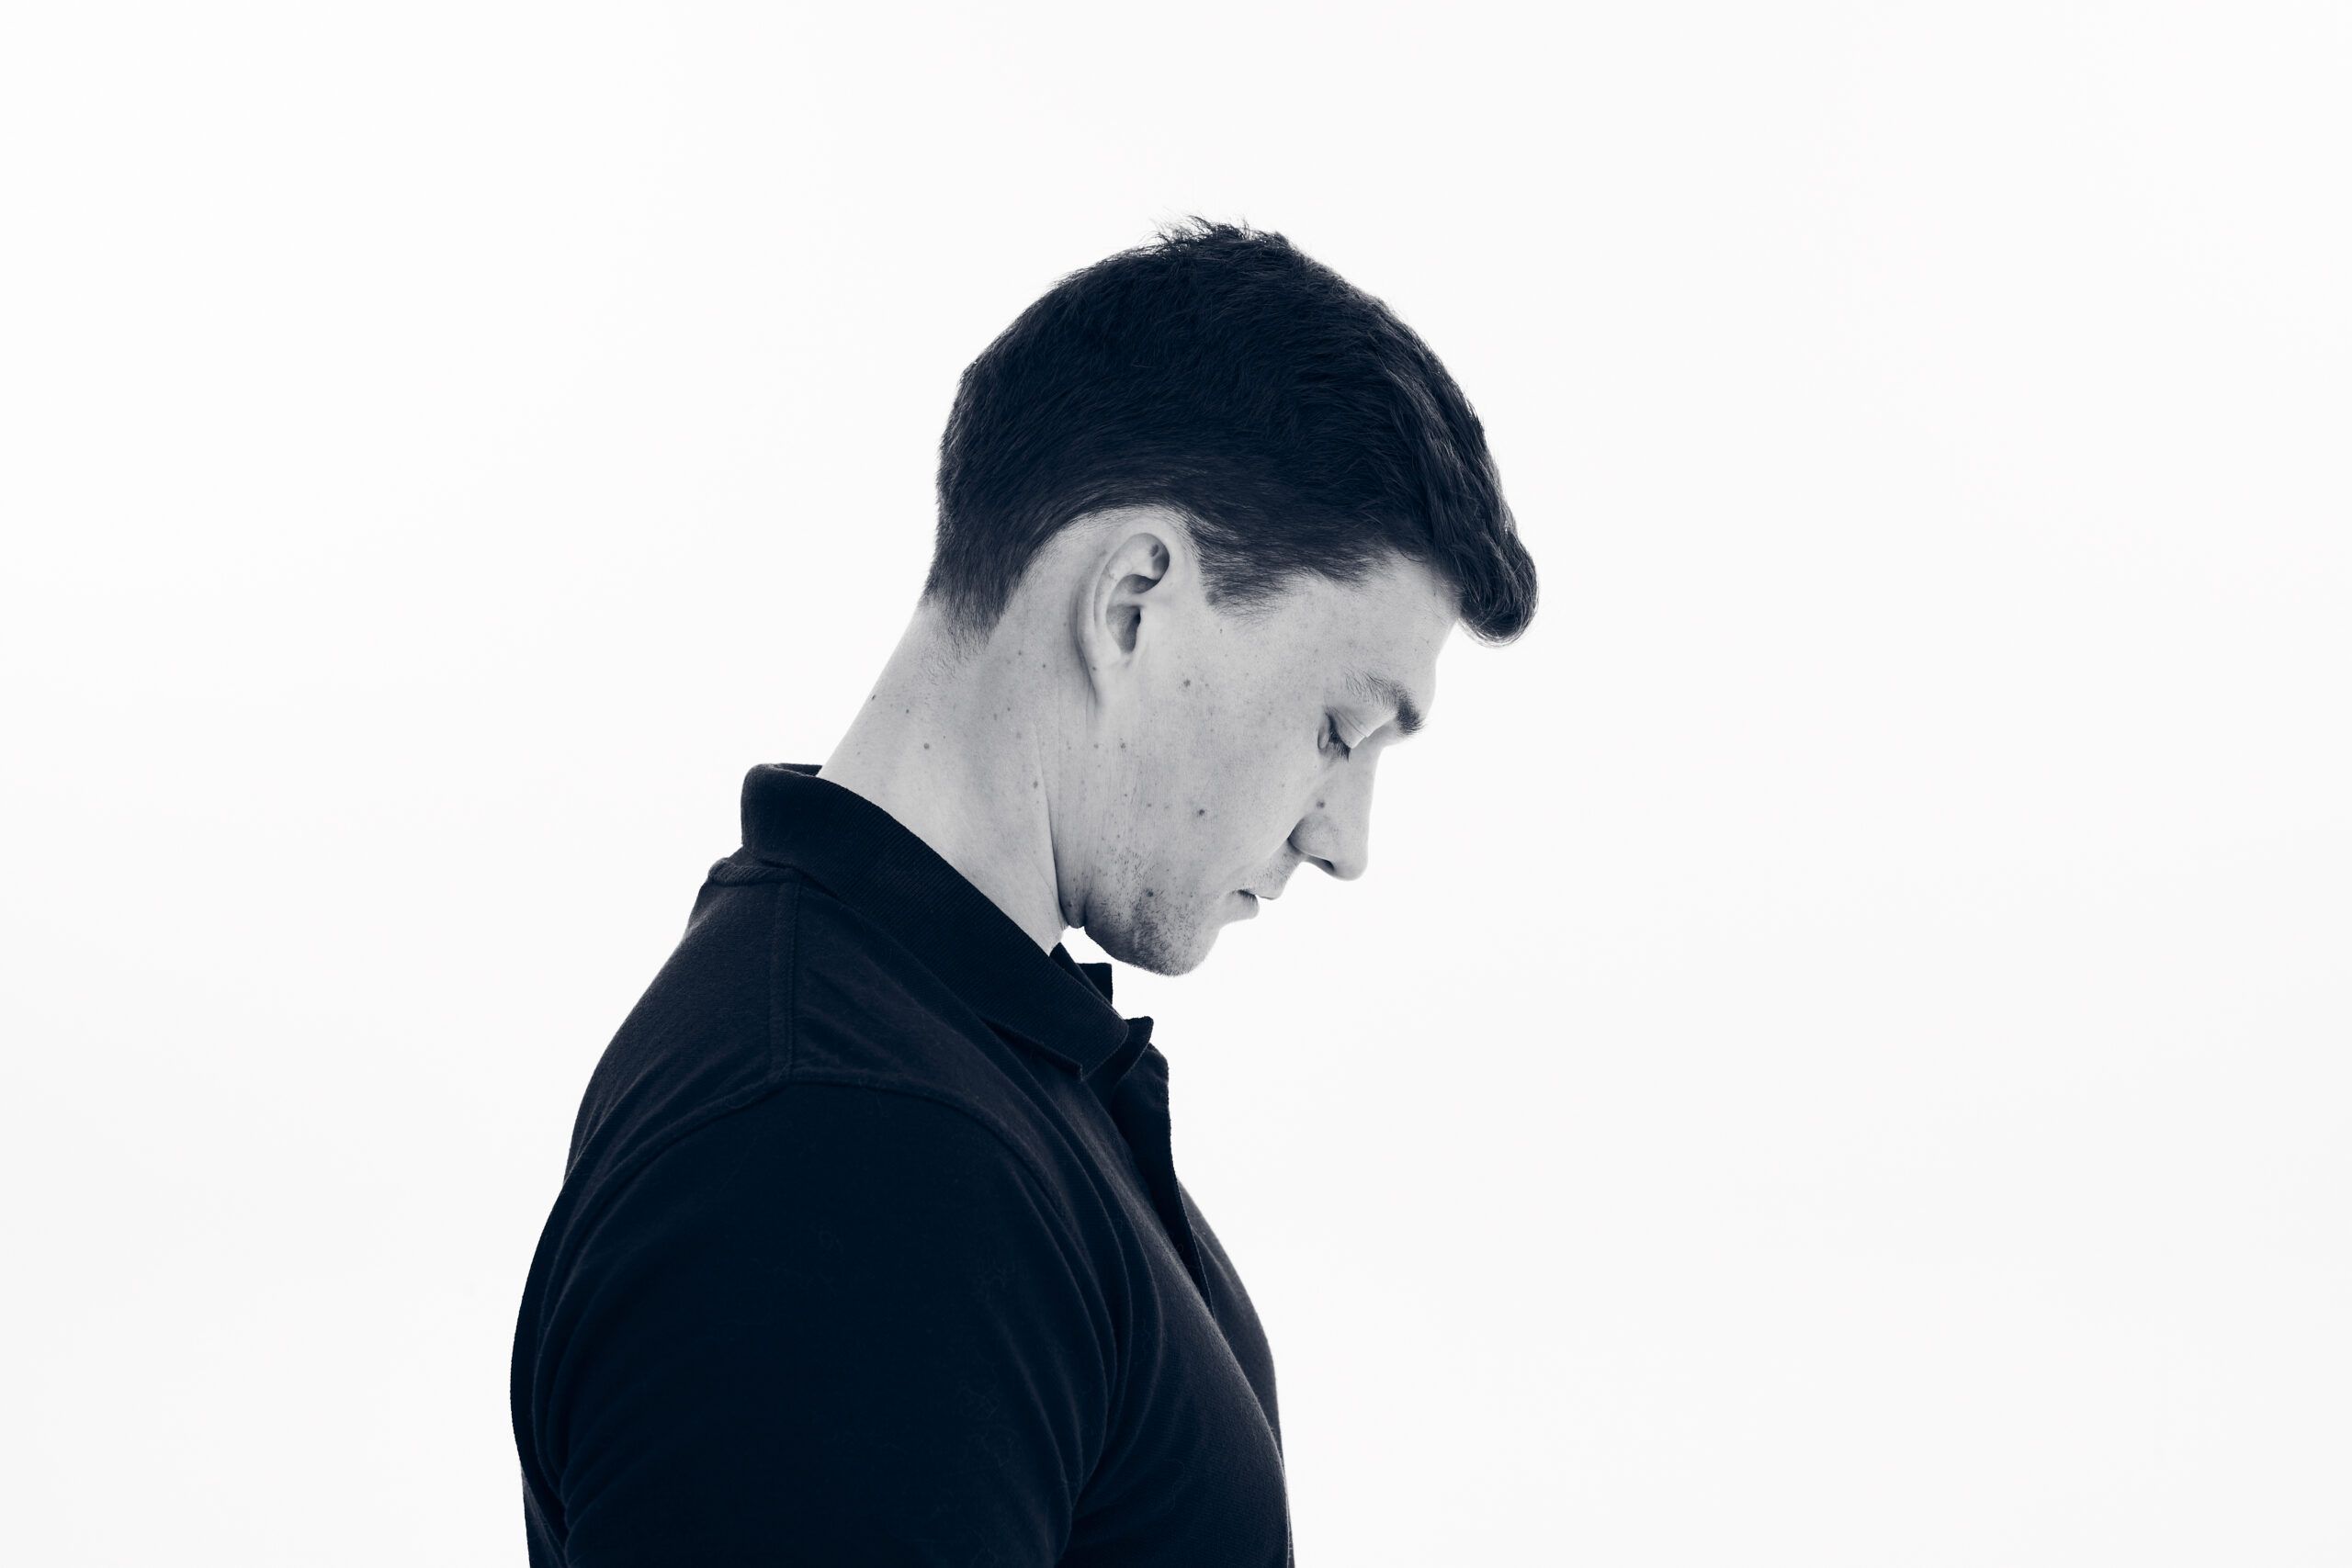
2. Extension: Gently tilt your head backward
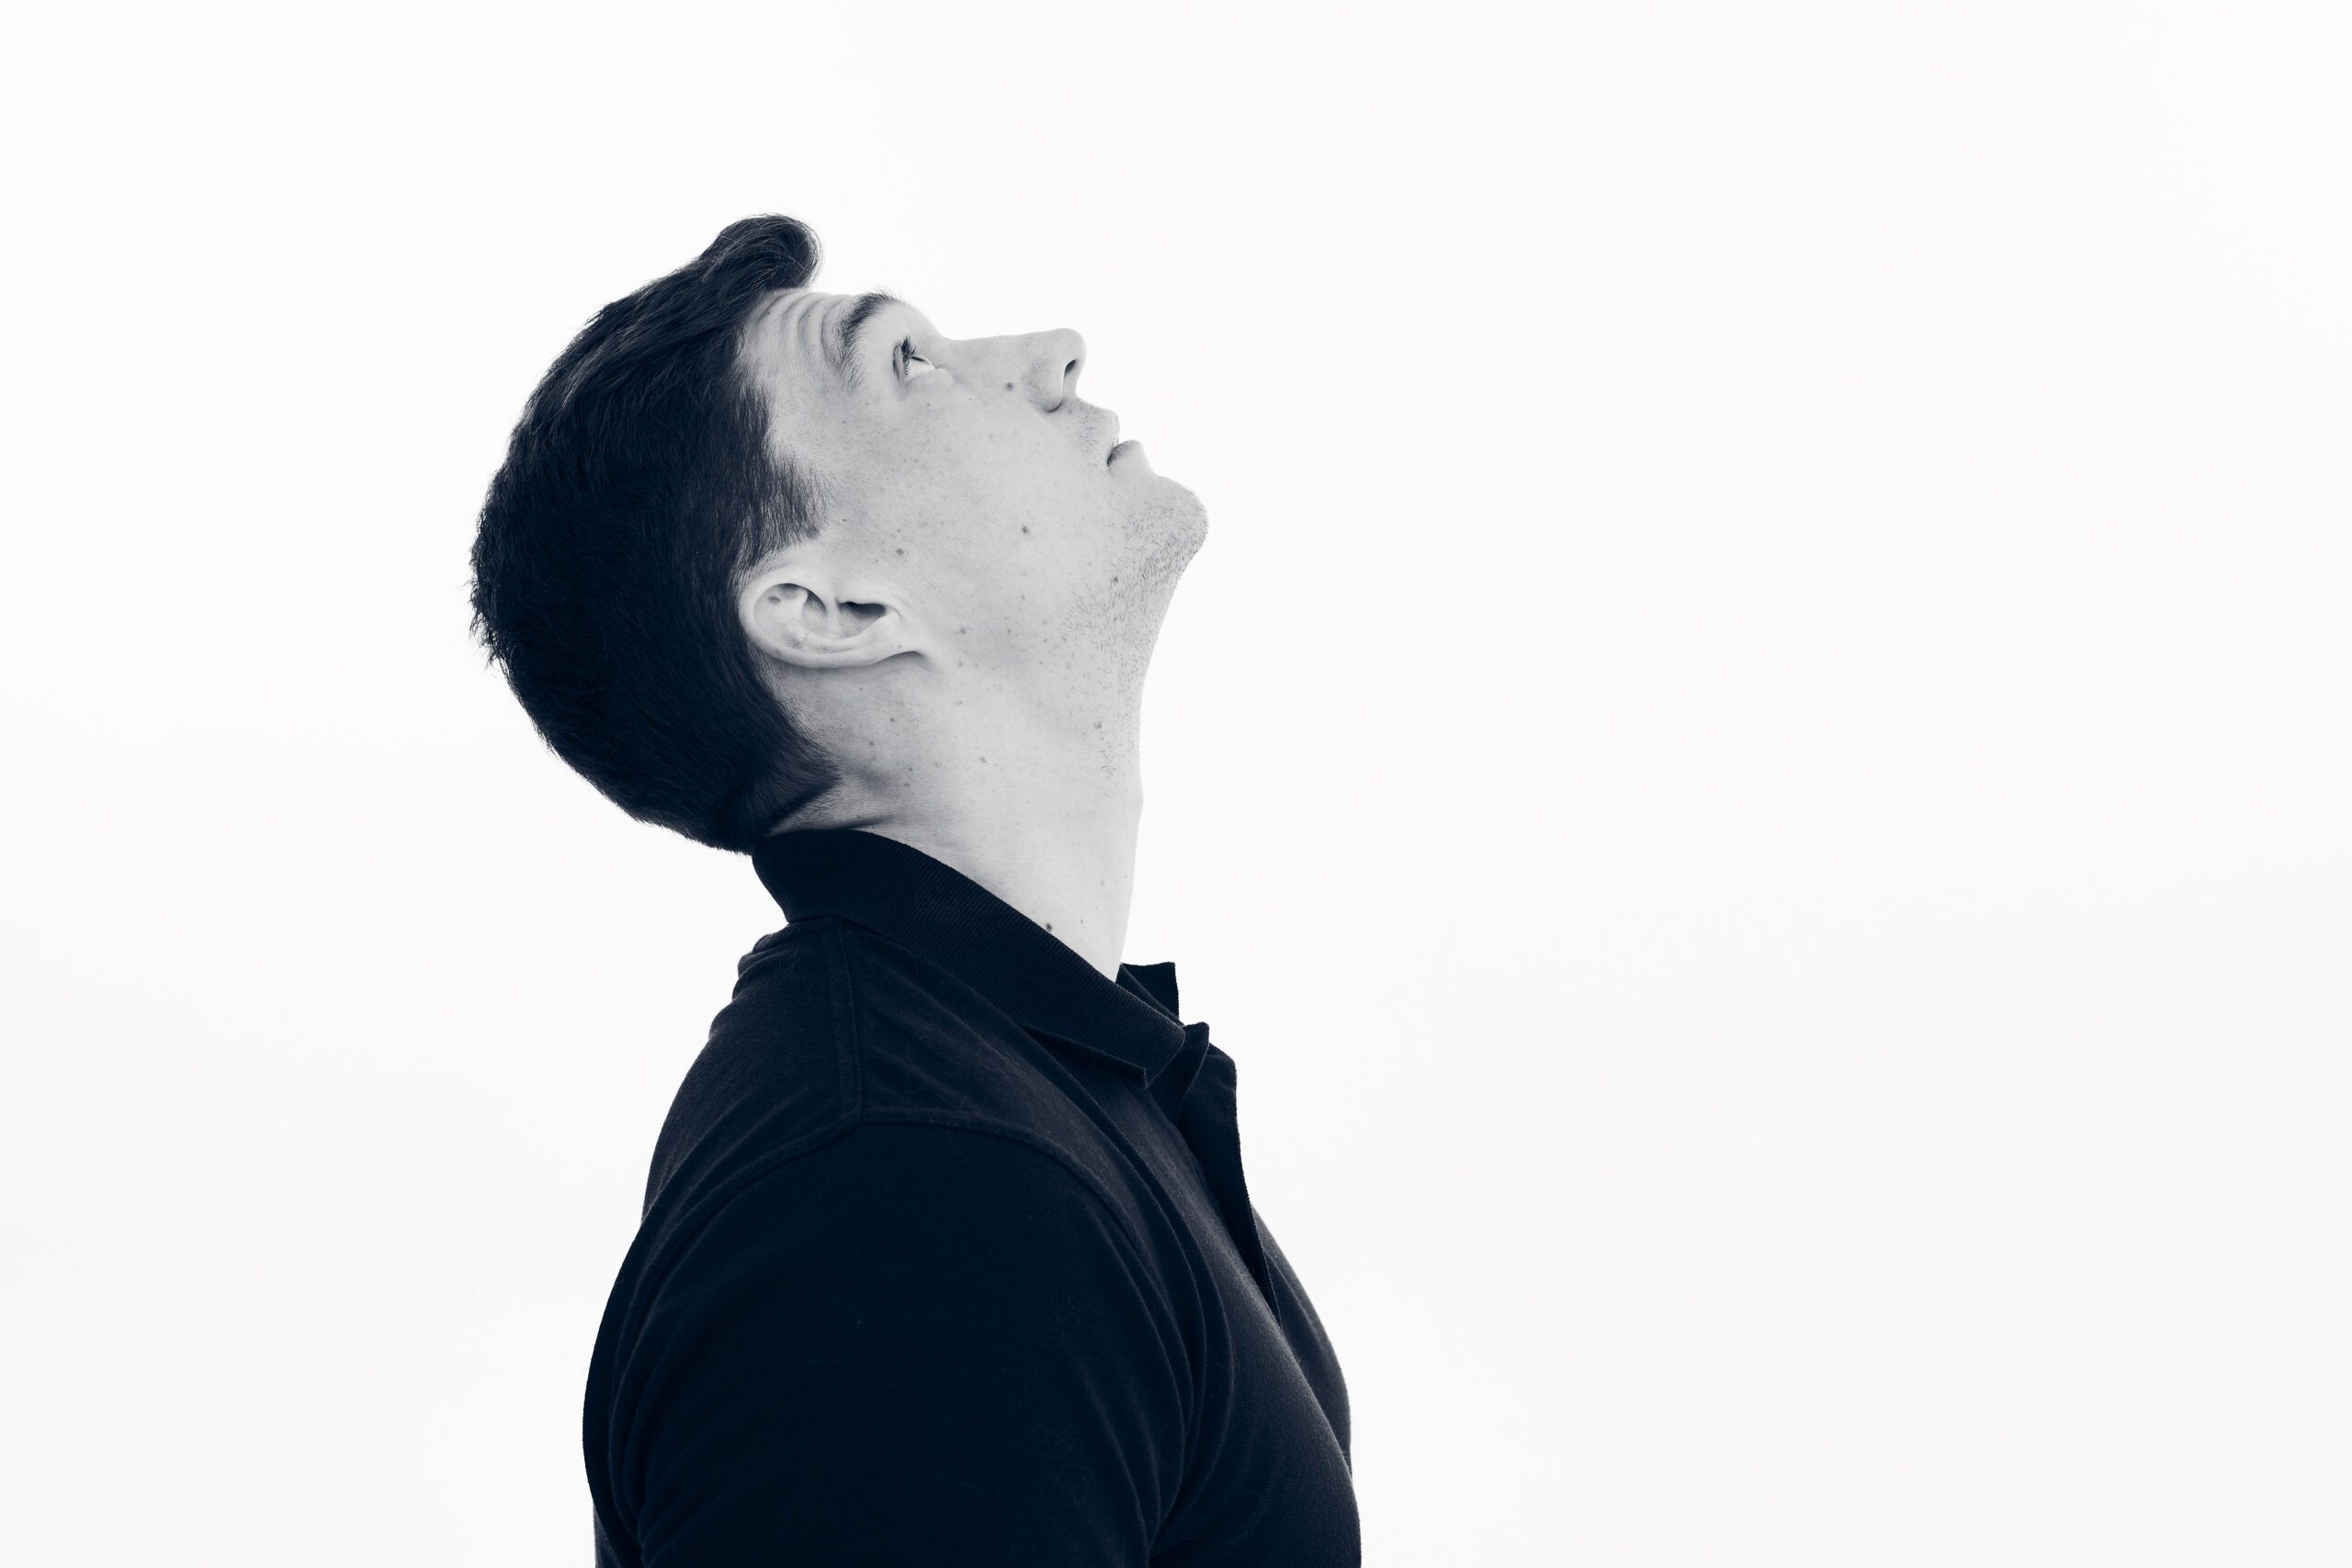
3. Right side flexion: Gently tilt your head down toward your right shoulder
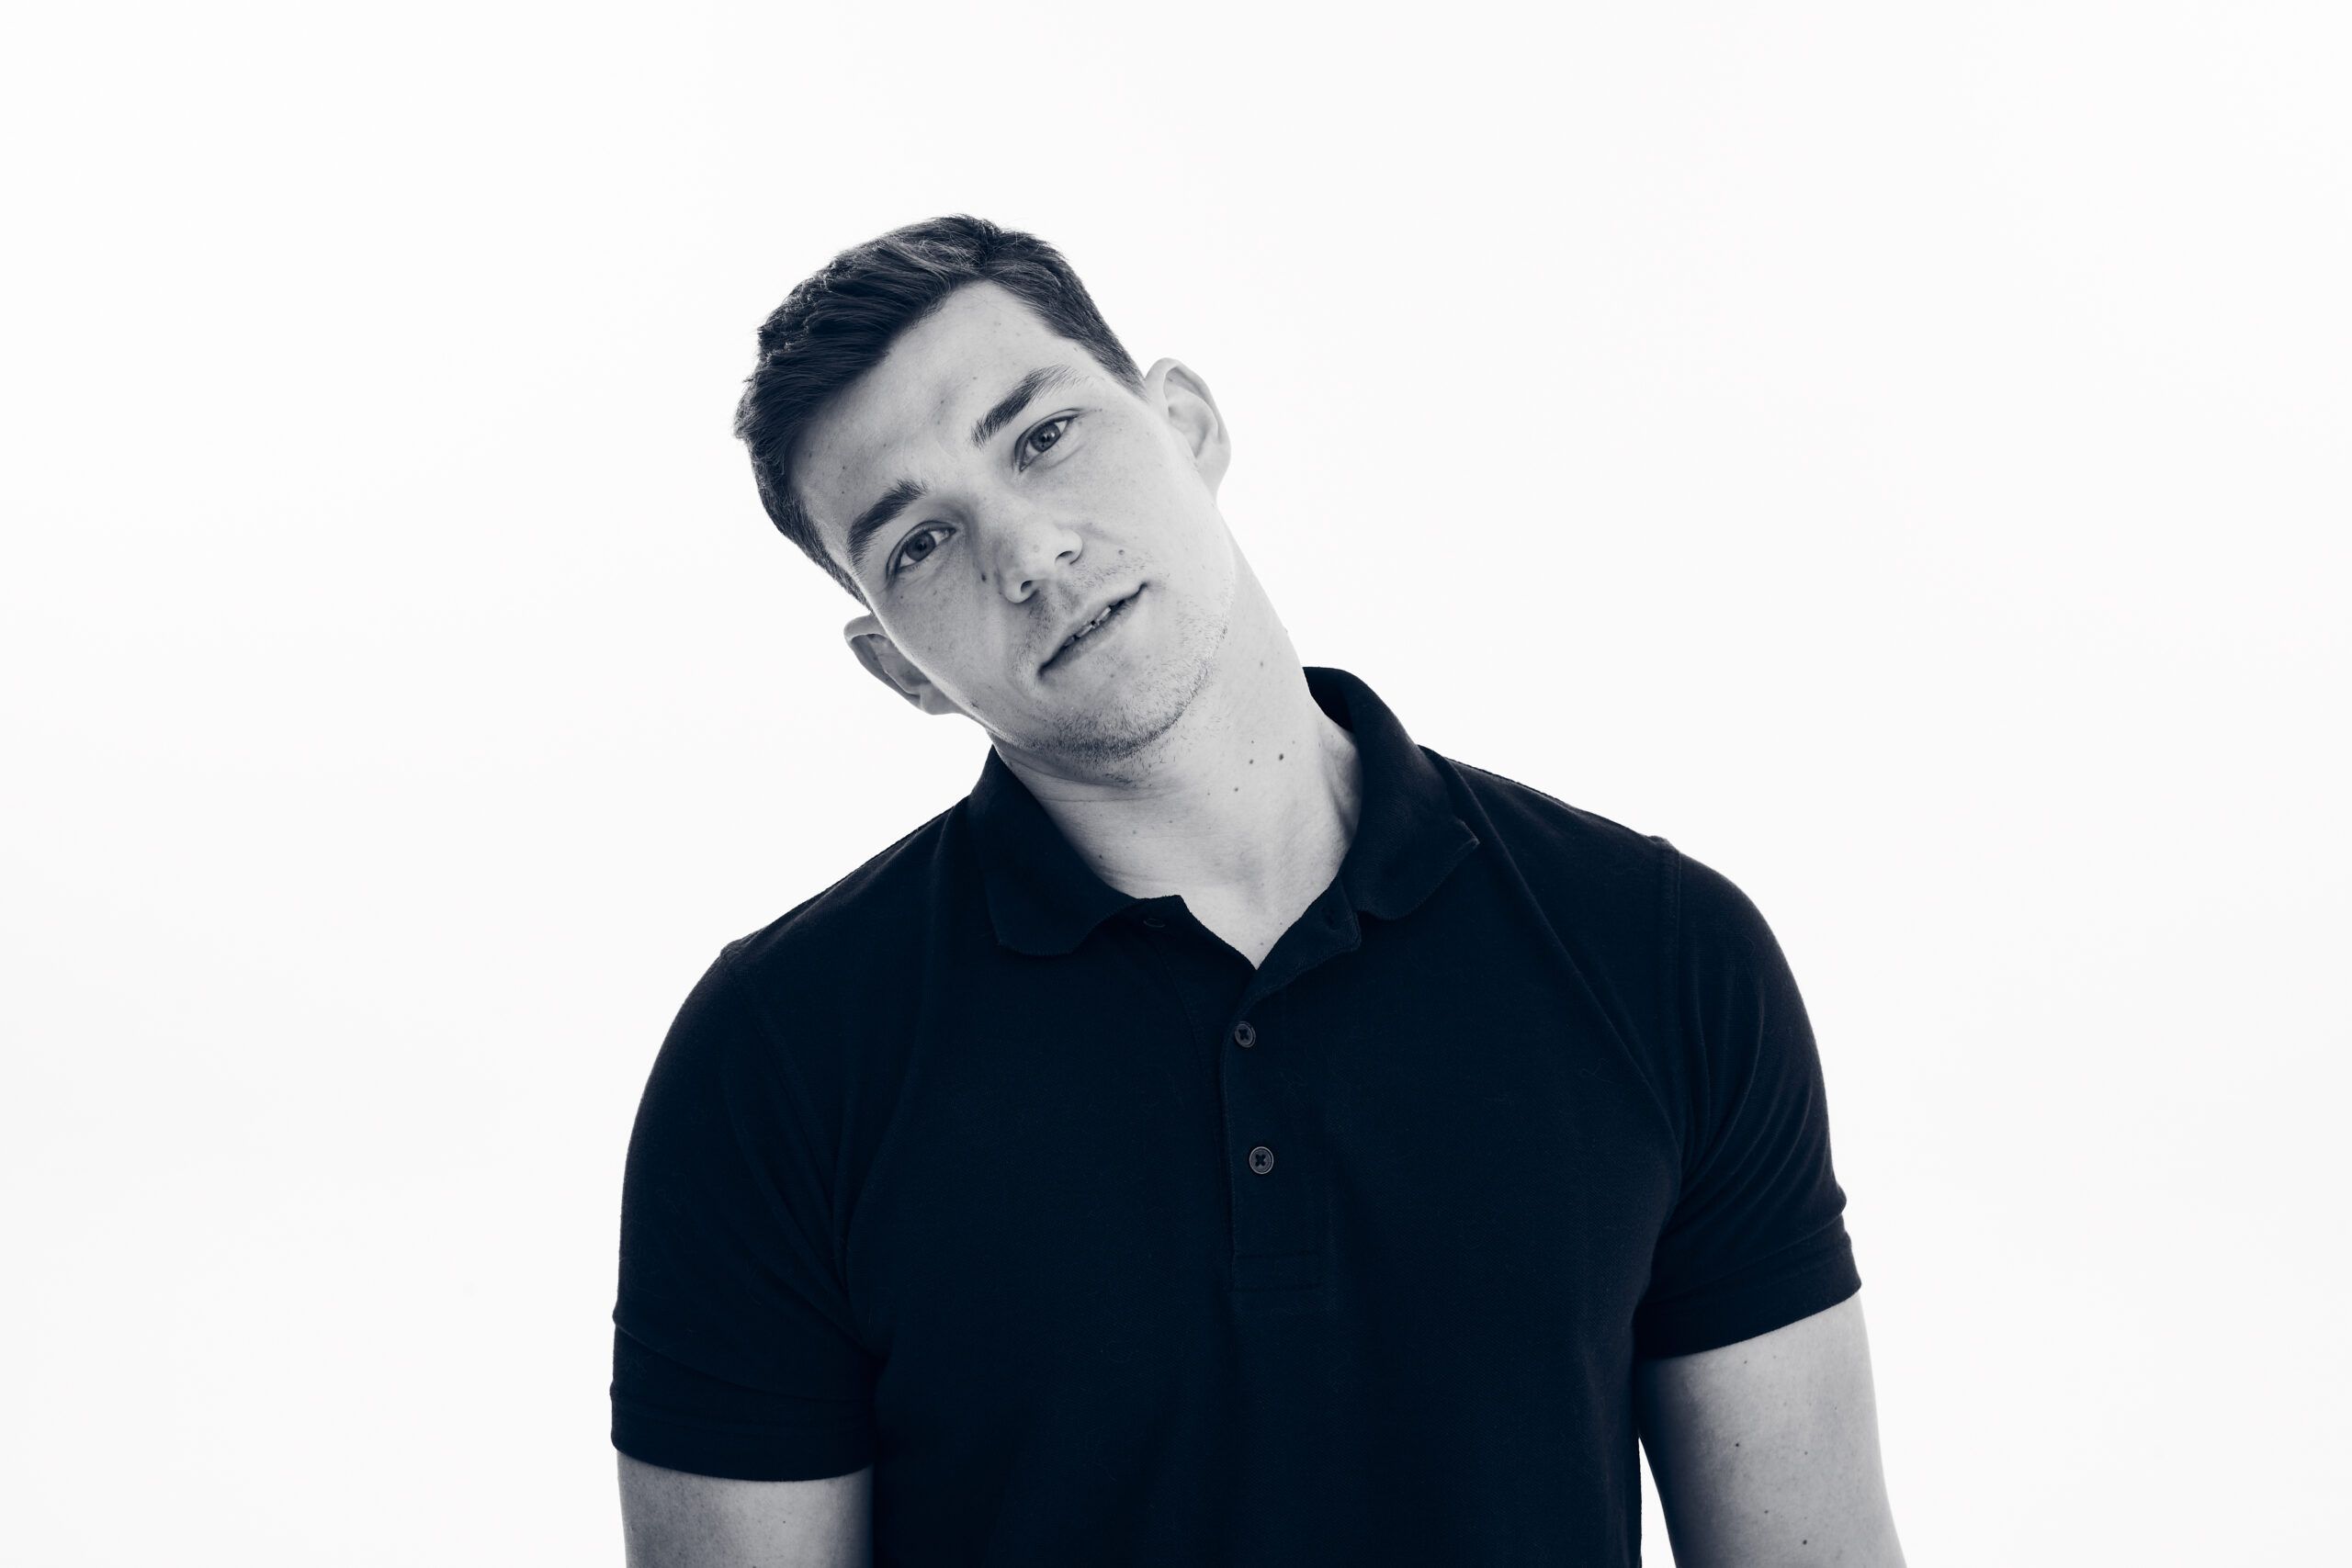
4. Left side flexion: Gently tilt your head down toward your left shoulder

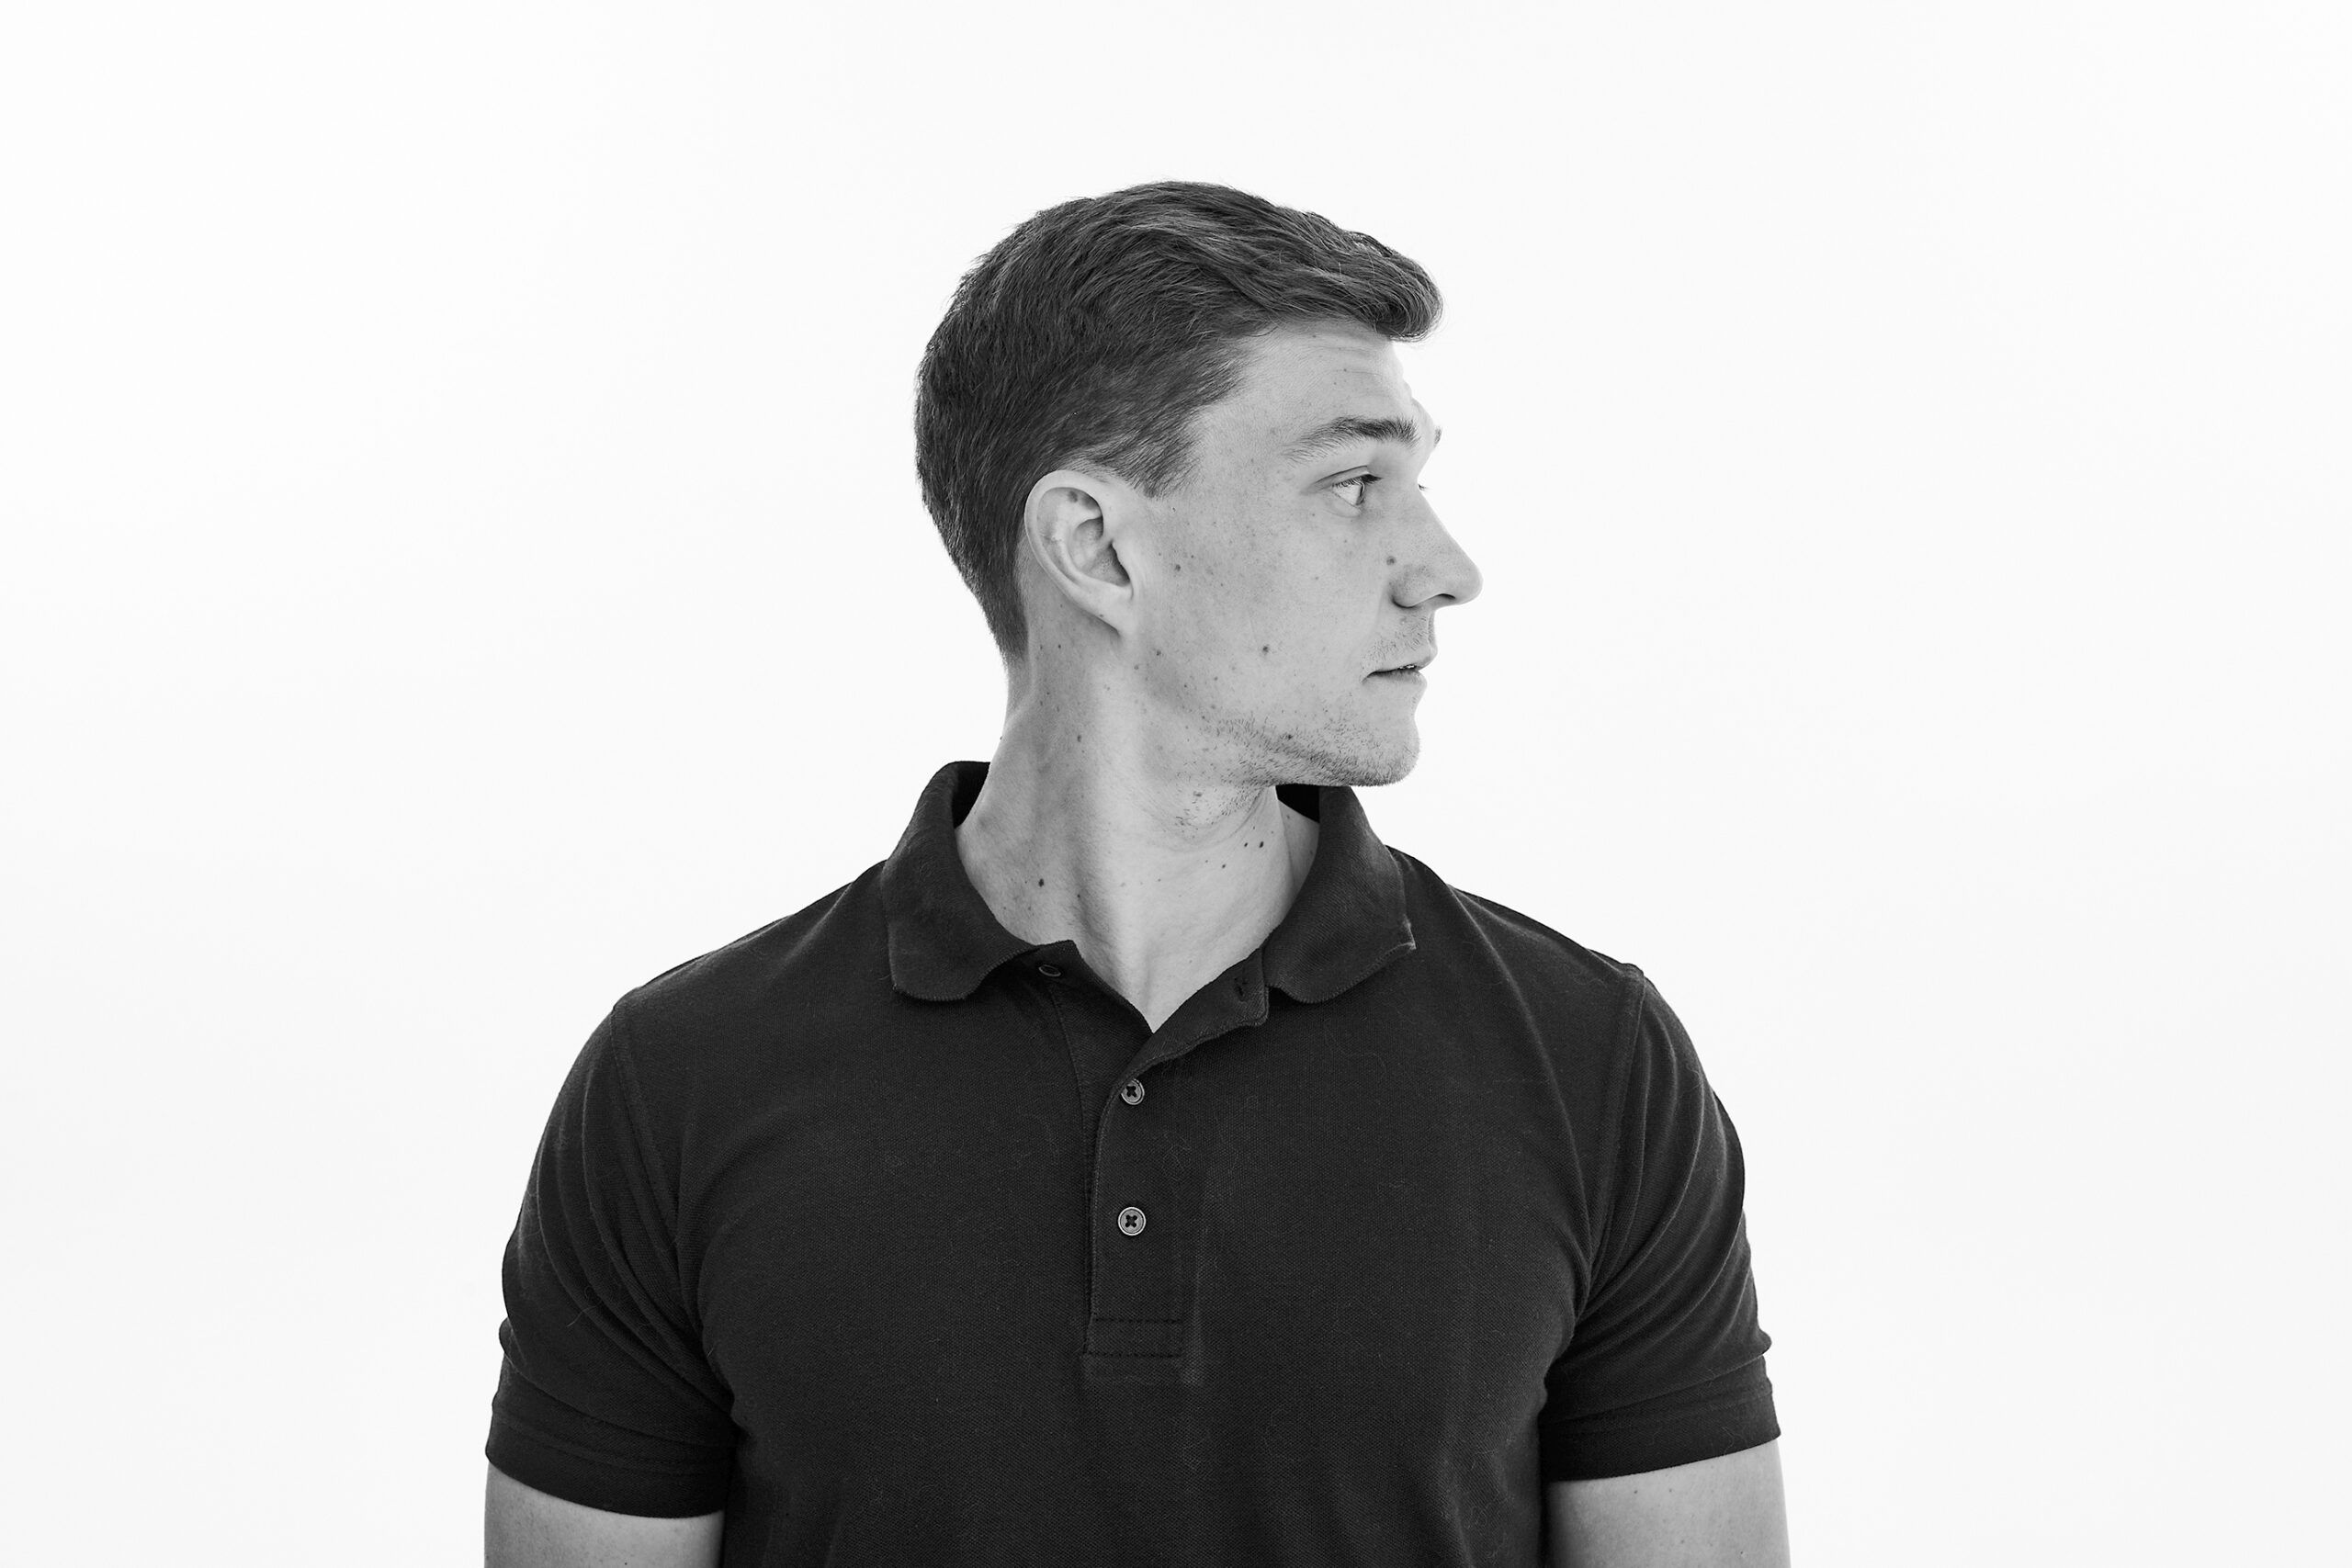
5. Right rotation: Gently turn your head to the right
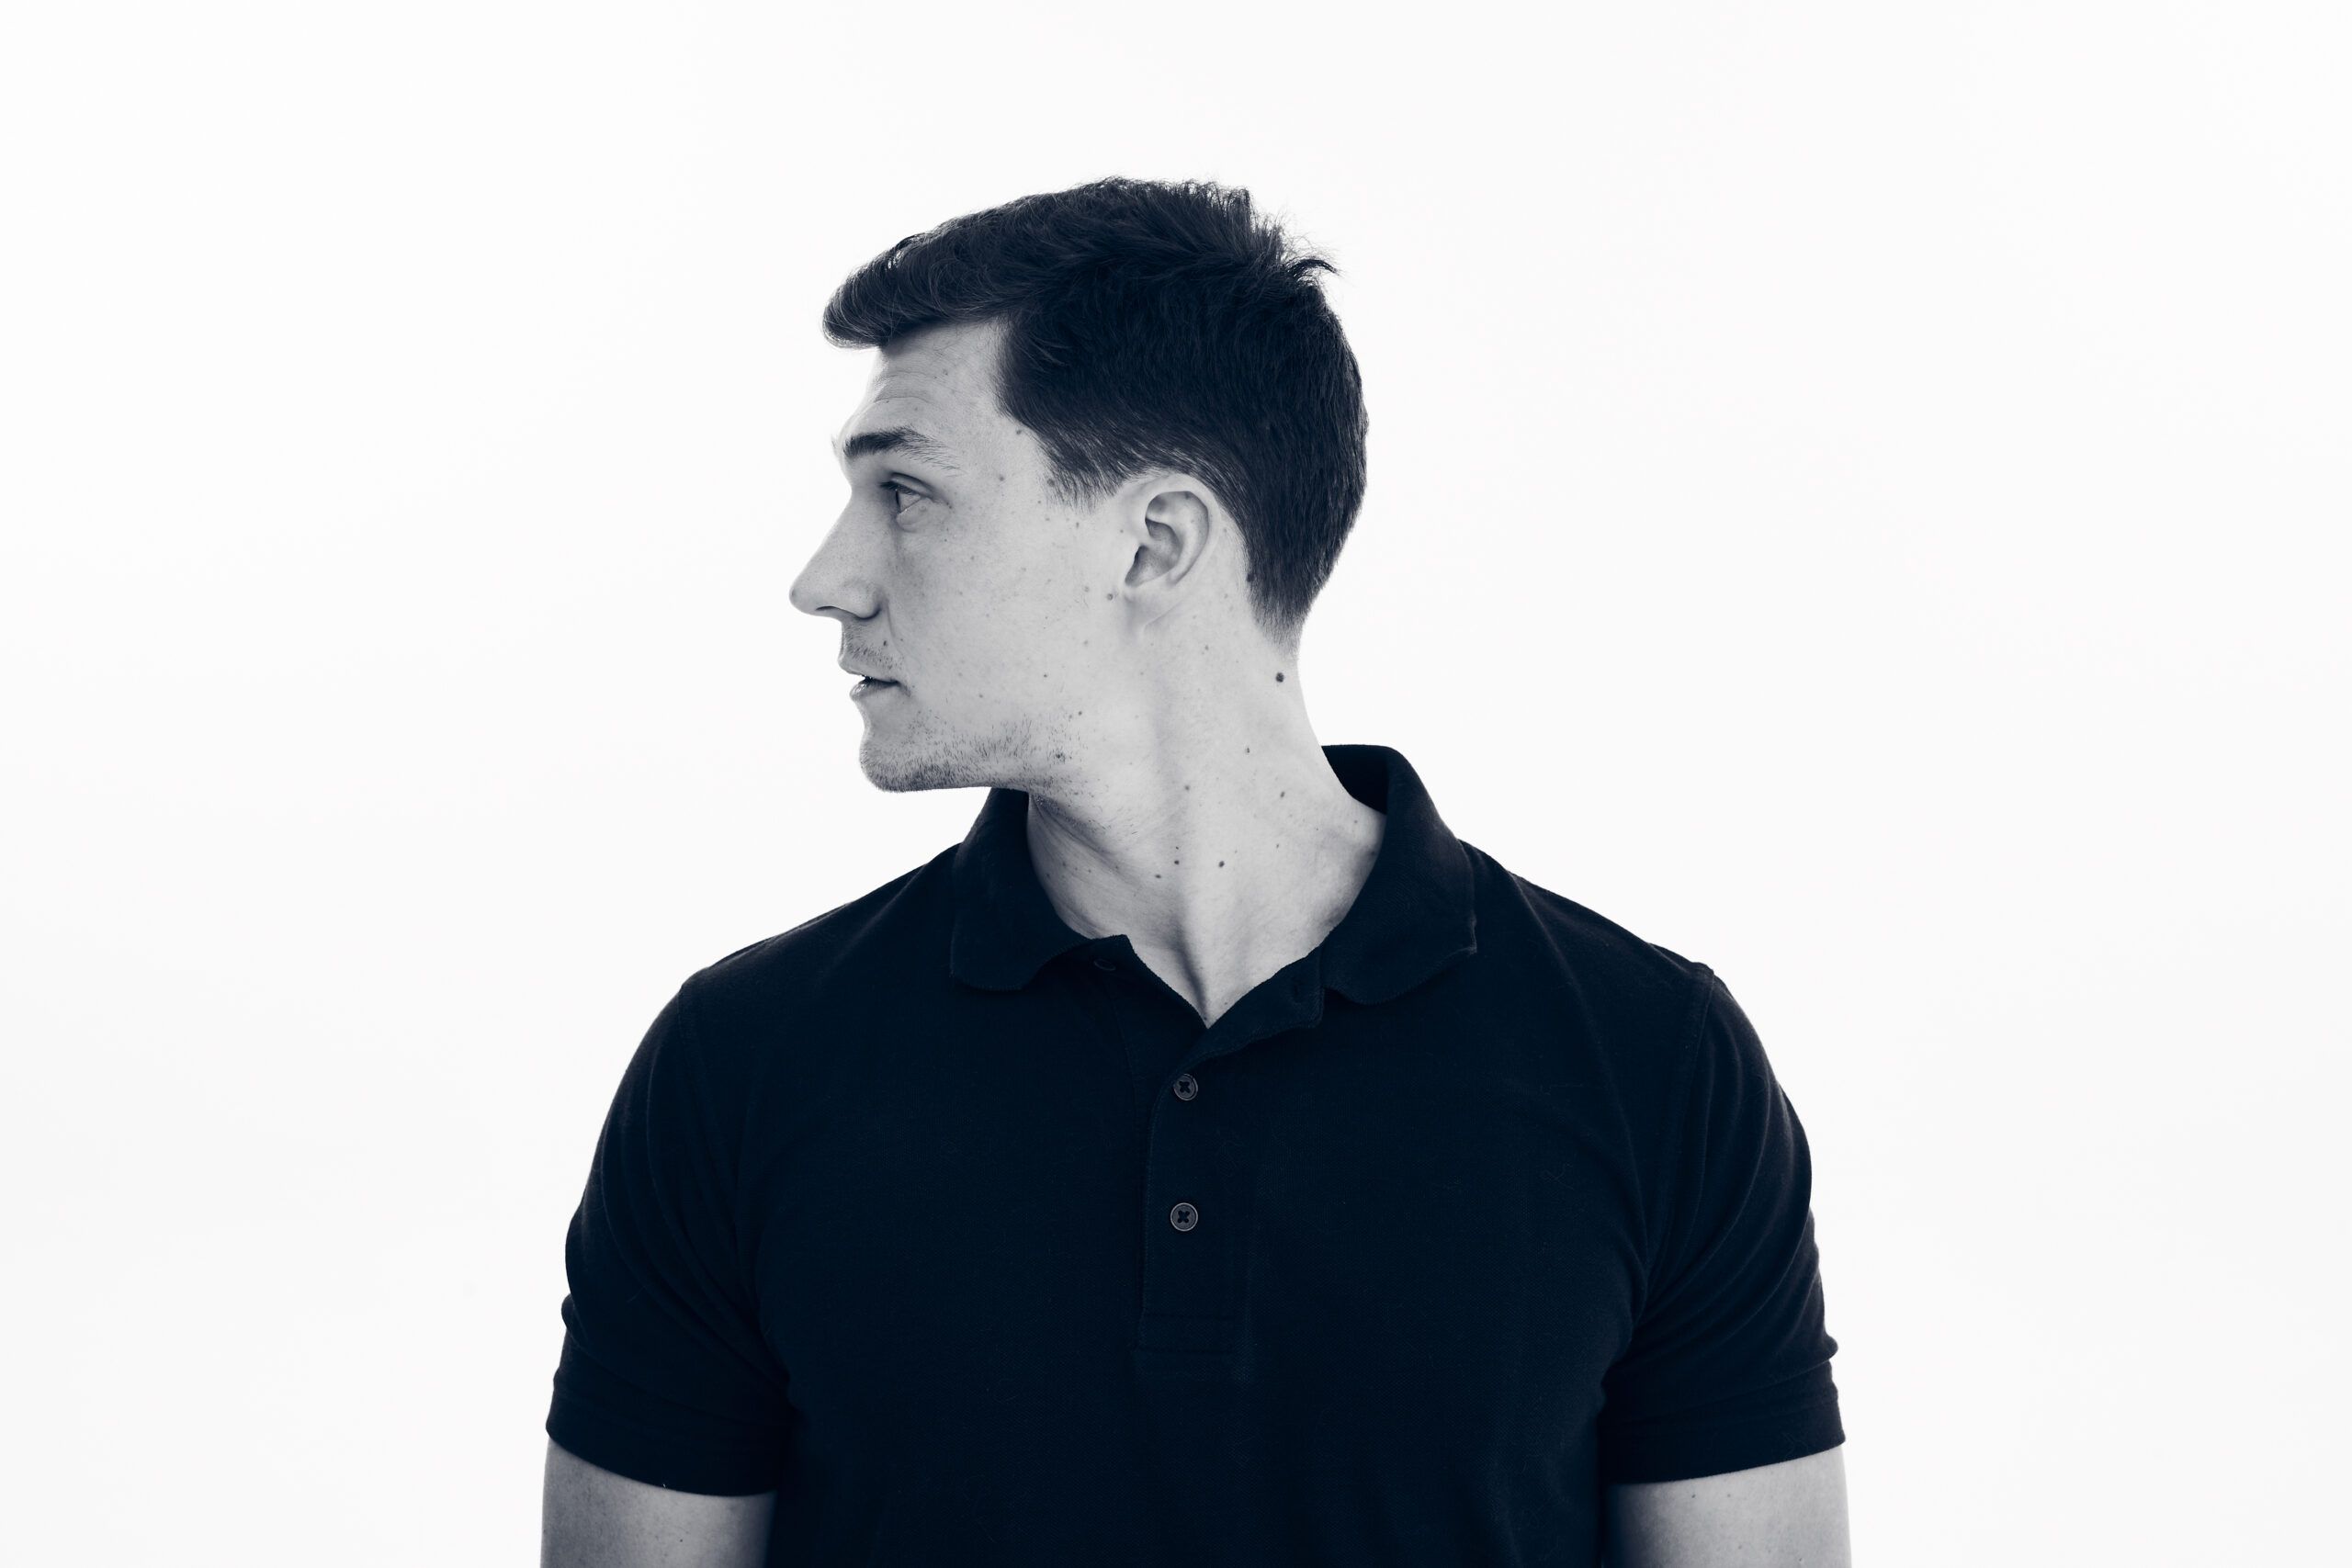
6. Left rotation: Gently turn your head to the left
The chin tuck
I usually recommend dedicating at least 10 minutes a day, split evenly into smaller chunks of time, to this exercise. It’s perfect for most people who are suffering from neck pain or would like to take out an insurance policy against neck arthritis in the future.
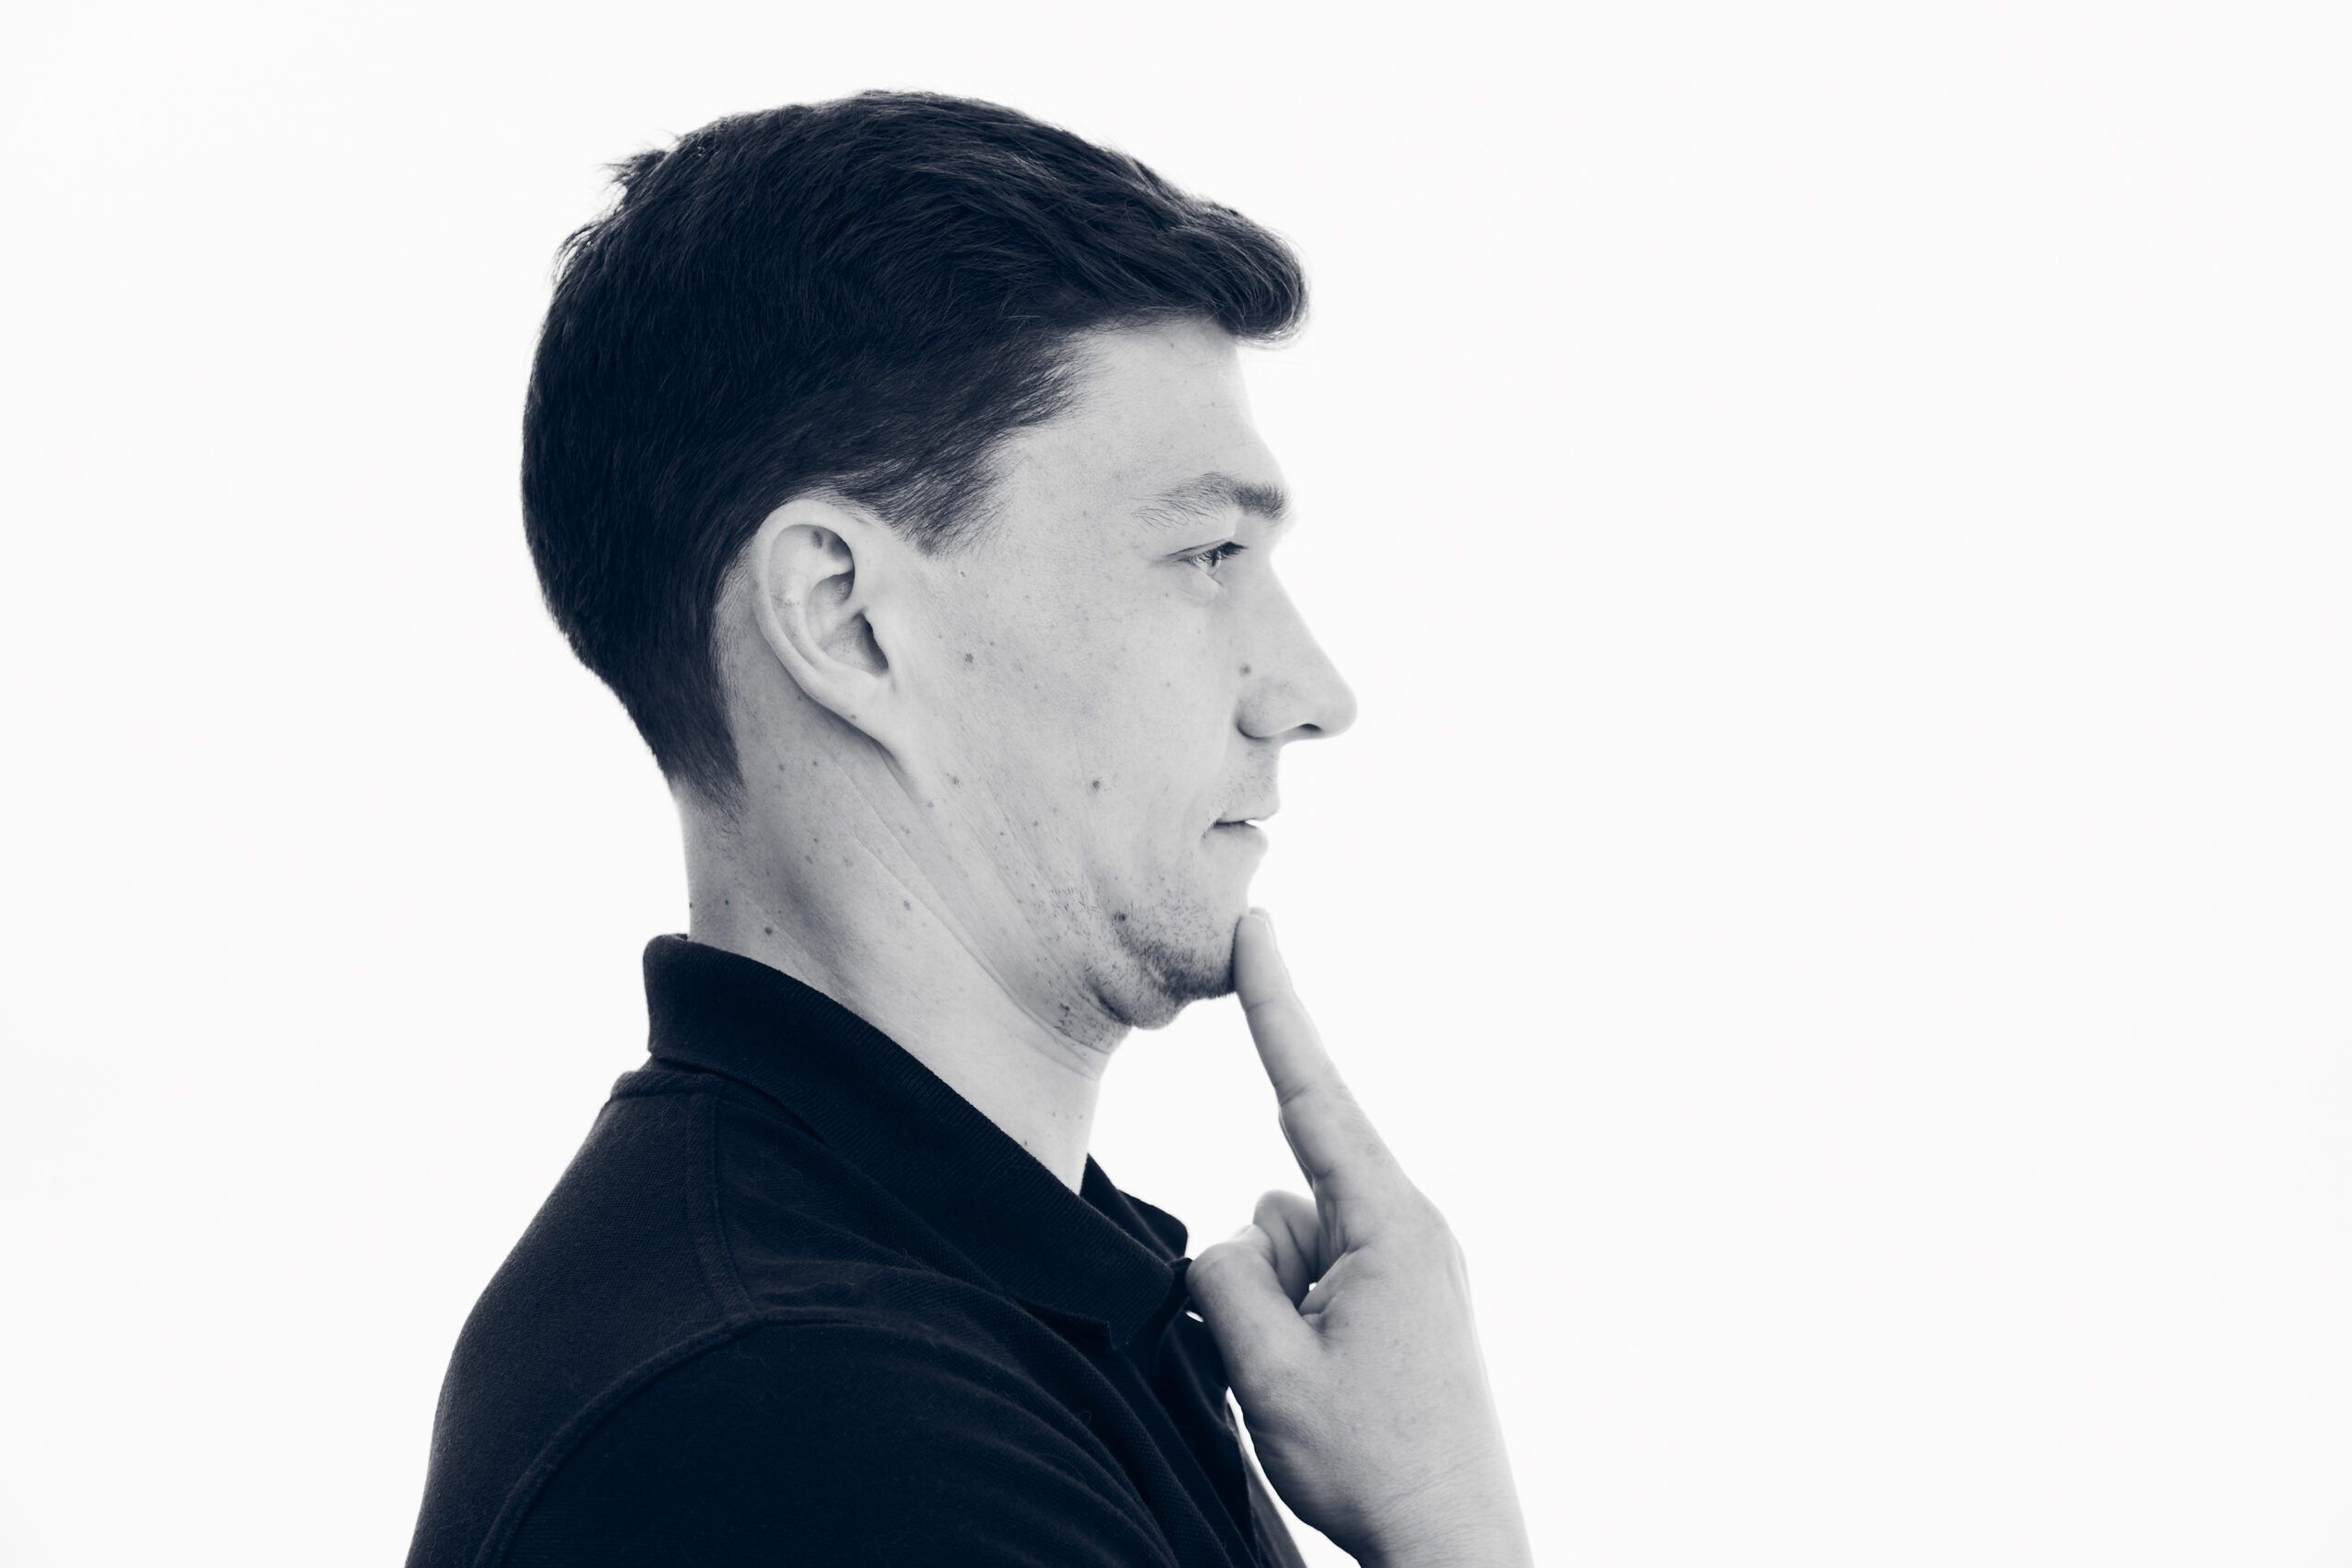
Here’s how you can find the muscles we want to activate: from a sitting position, keep your eyes level and pull your chin in, as if to make a double chin. The muscles you can feel working are the ones we’ll target.
Repeat the movement for several minutes whenever you’re sitting still for any length of time.
1. Sit upright somewhere comfortable with your eyes looking straight ahead.
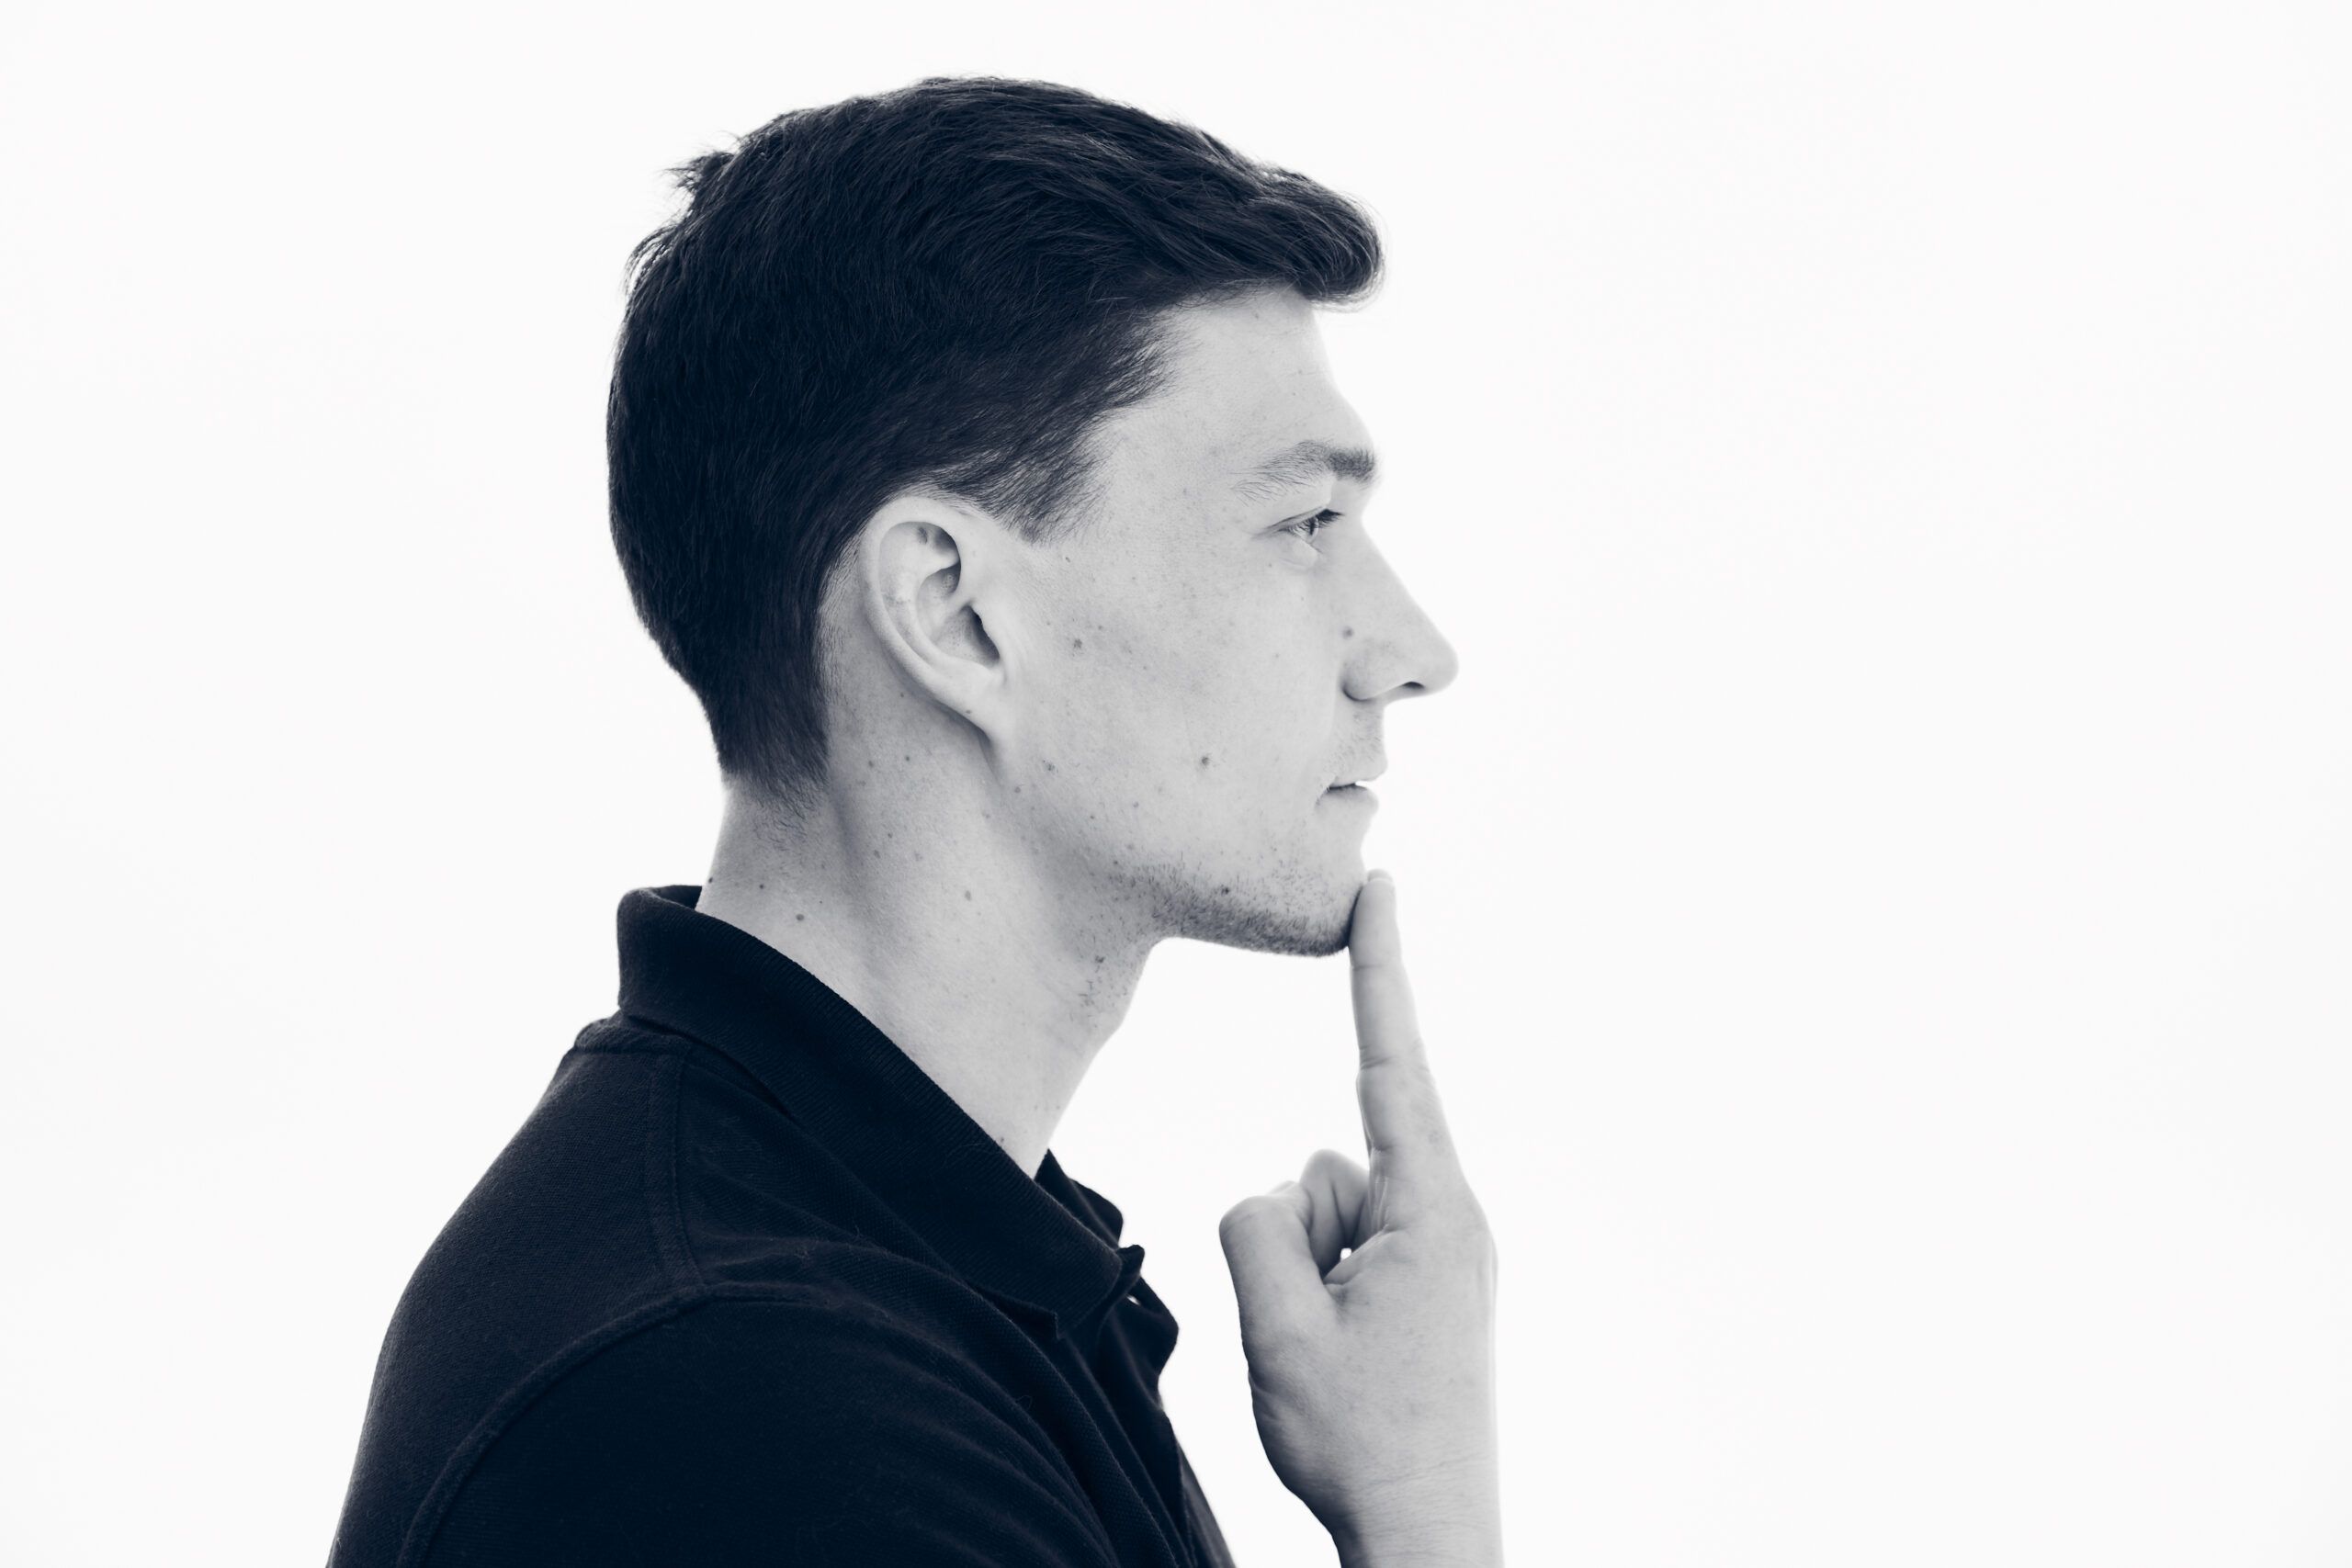
2. Gently pull your chin in as if you’re trying to make a subtle double chin. Keep your eyes straight ahead and don’t let your nose move toward the floor. Hold this position for five seconds, then relax to your normal position.
Two-minute seated rotation
This is a great routine to do after sitting or driving for any distance, or just whenever you feel stiffness in the thoracic spine.
1. Sit in a chair with your arms crossed over your chest.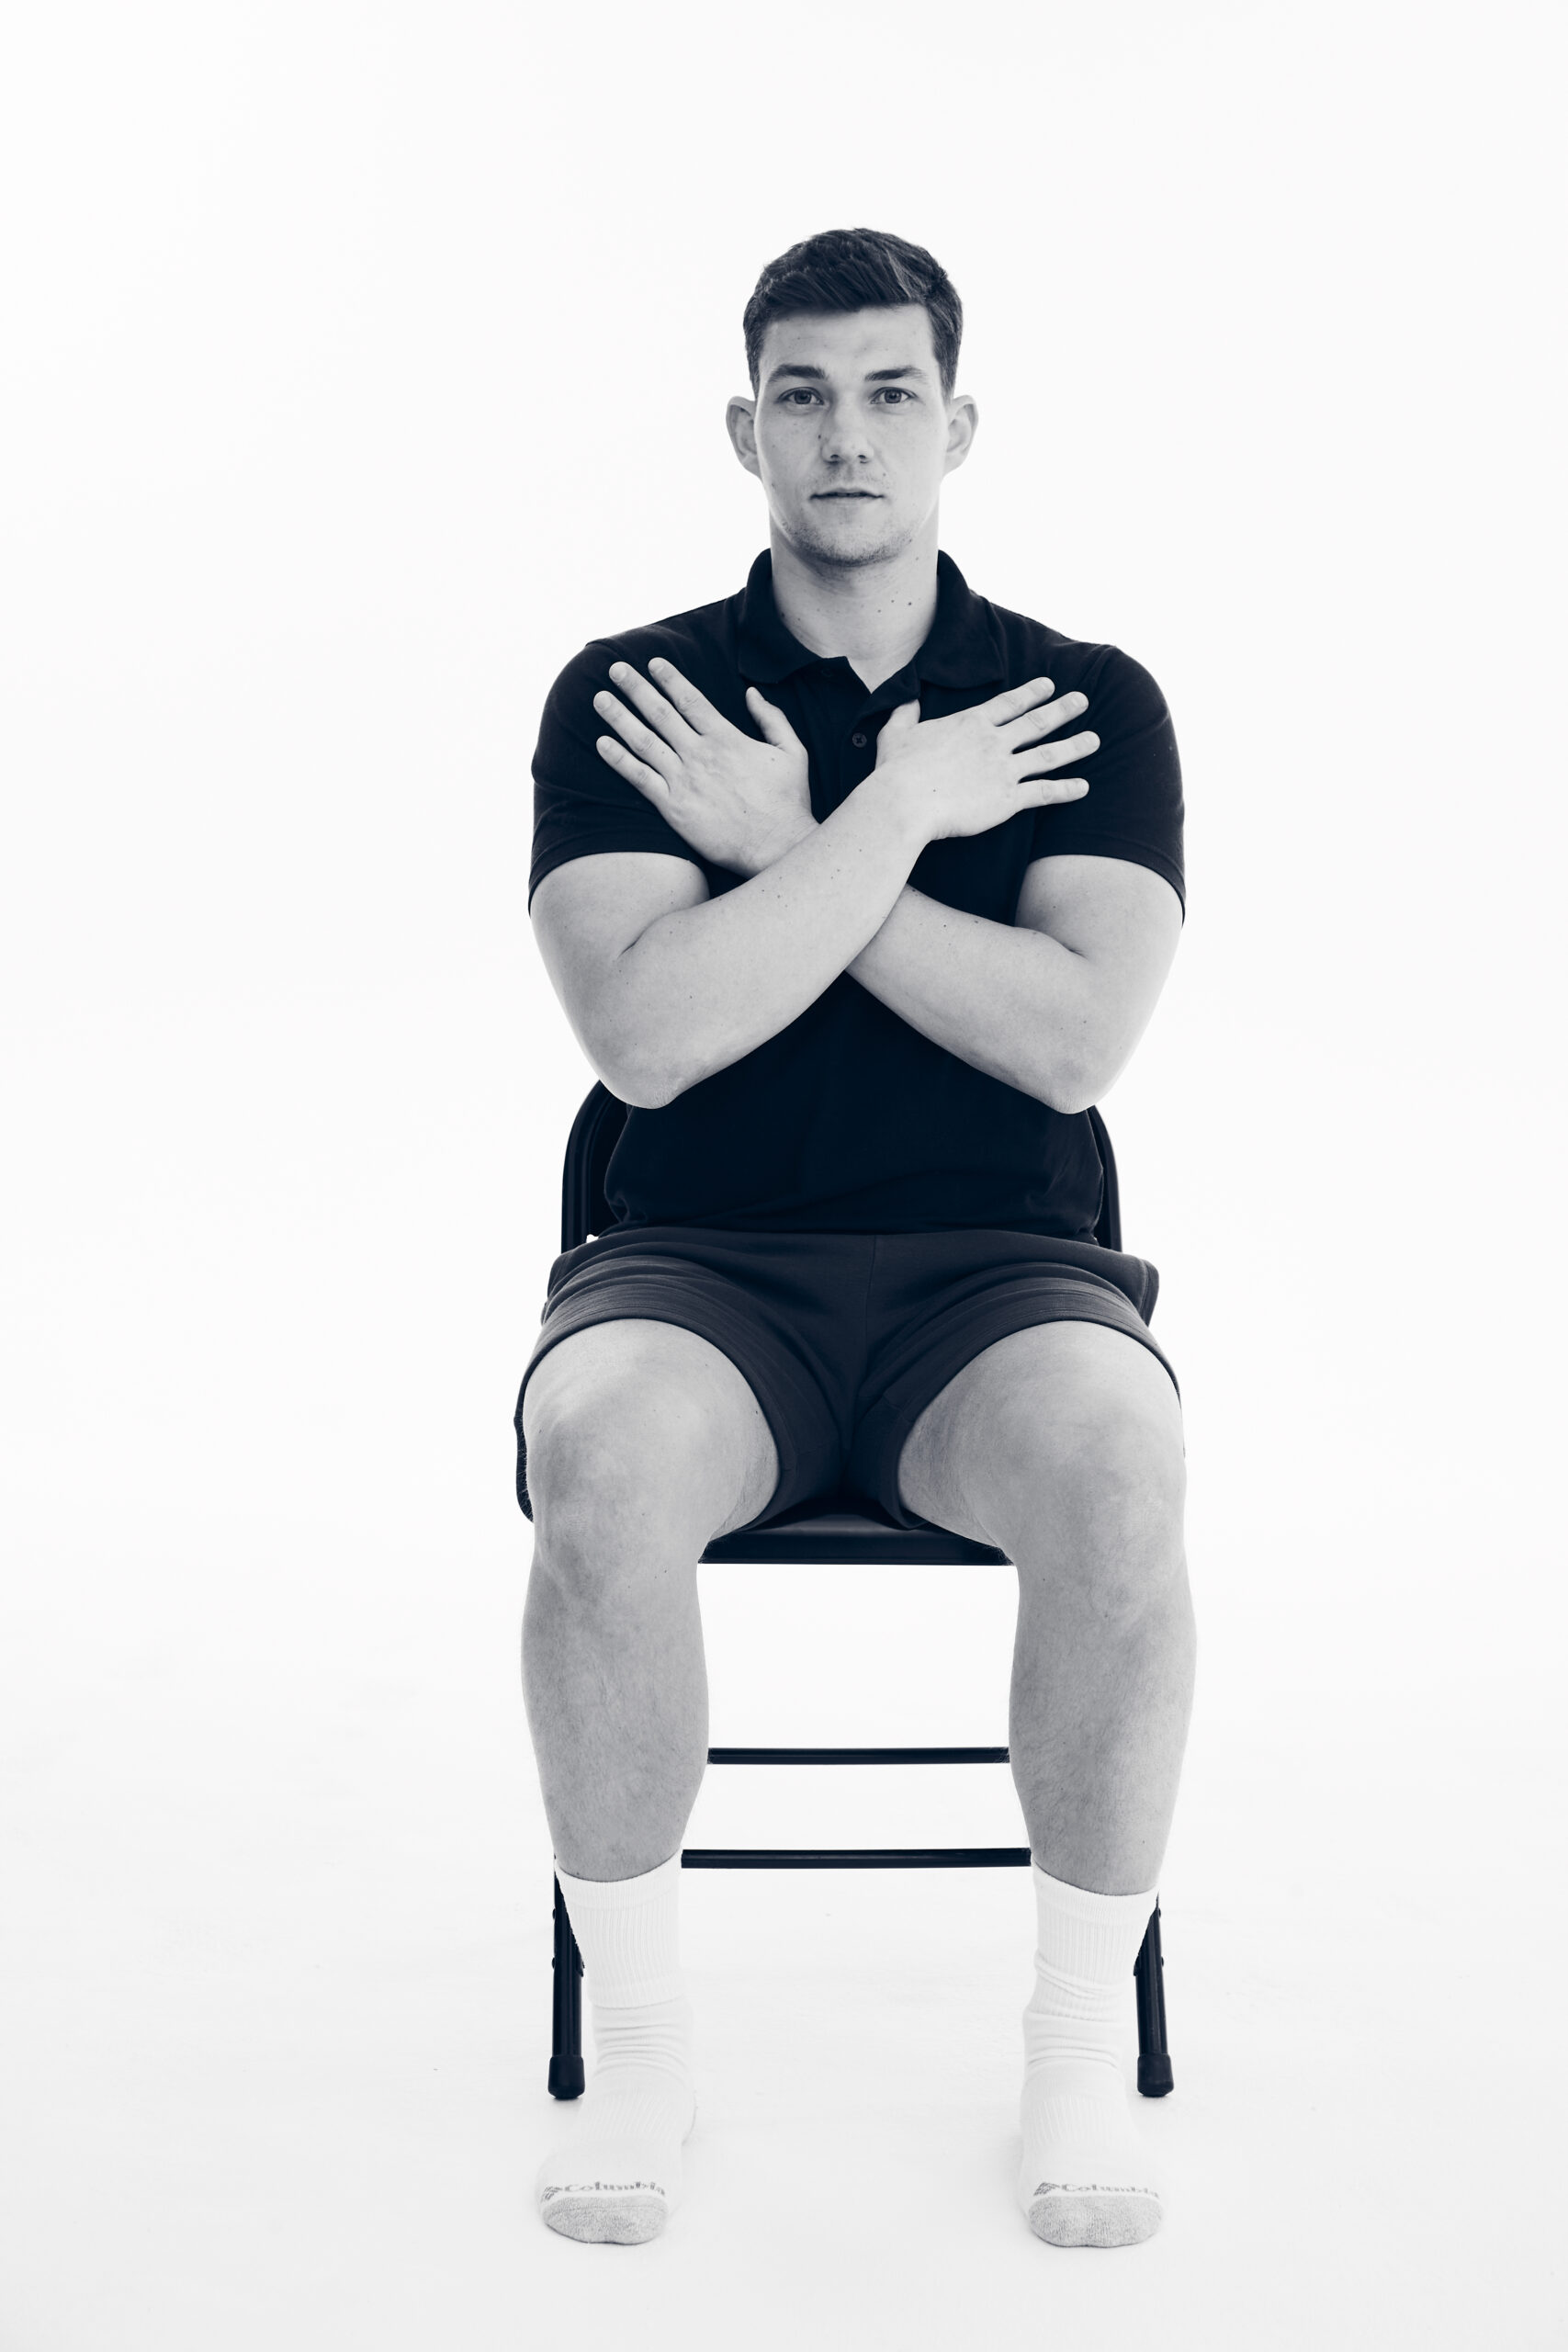
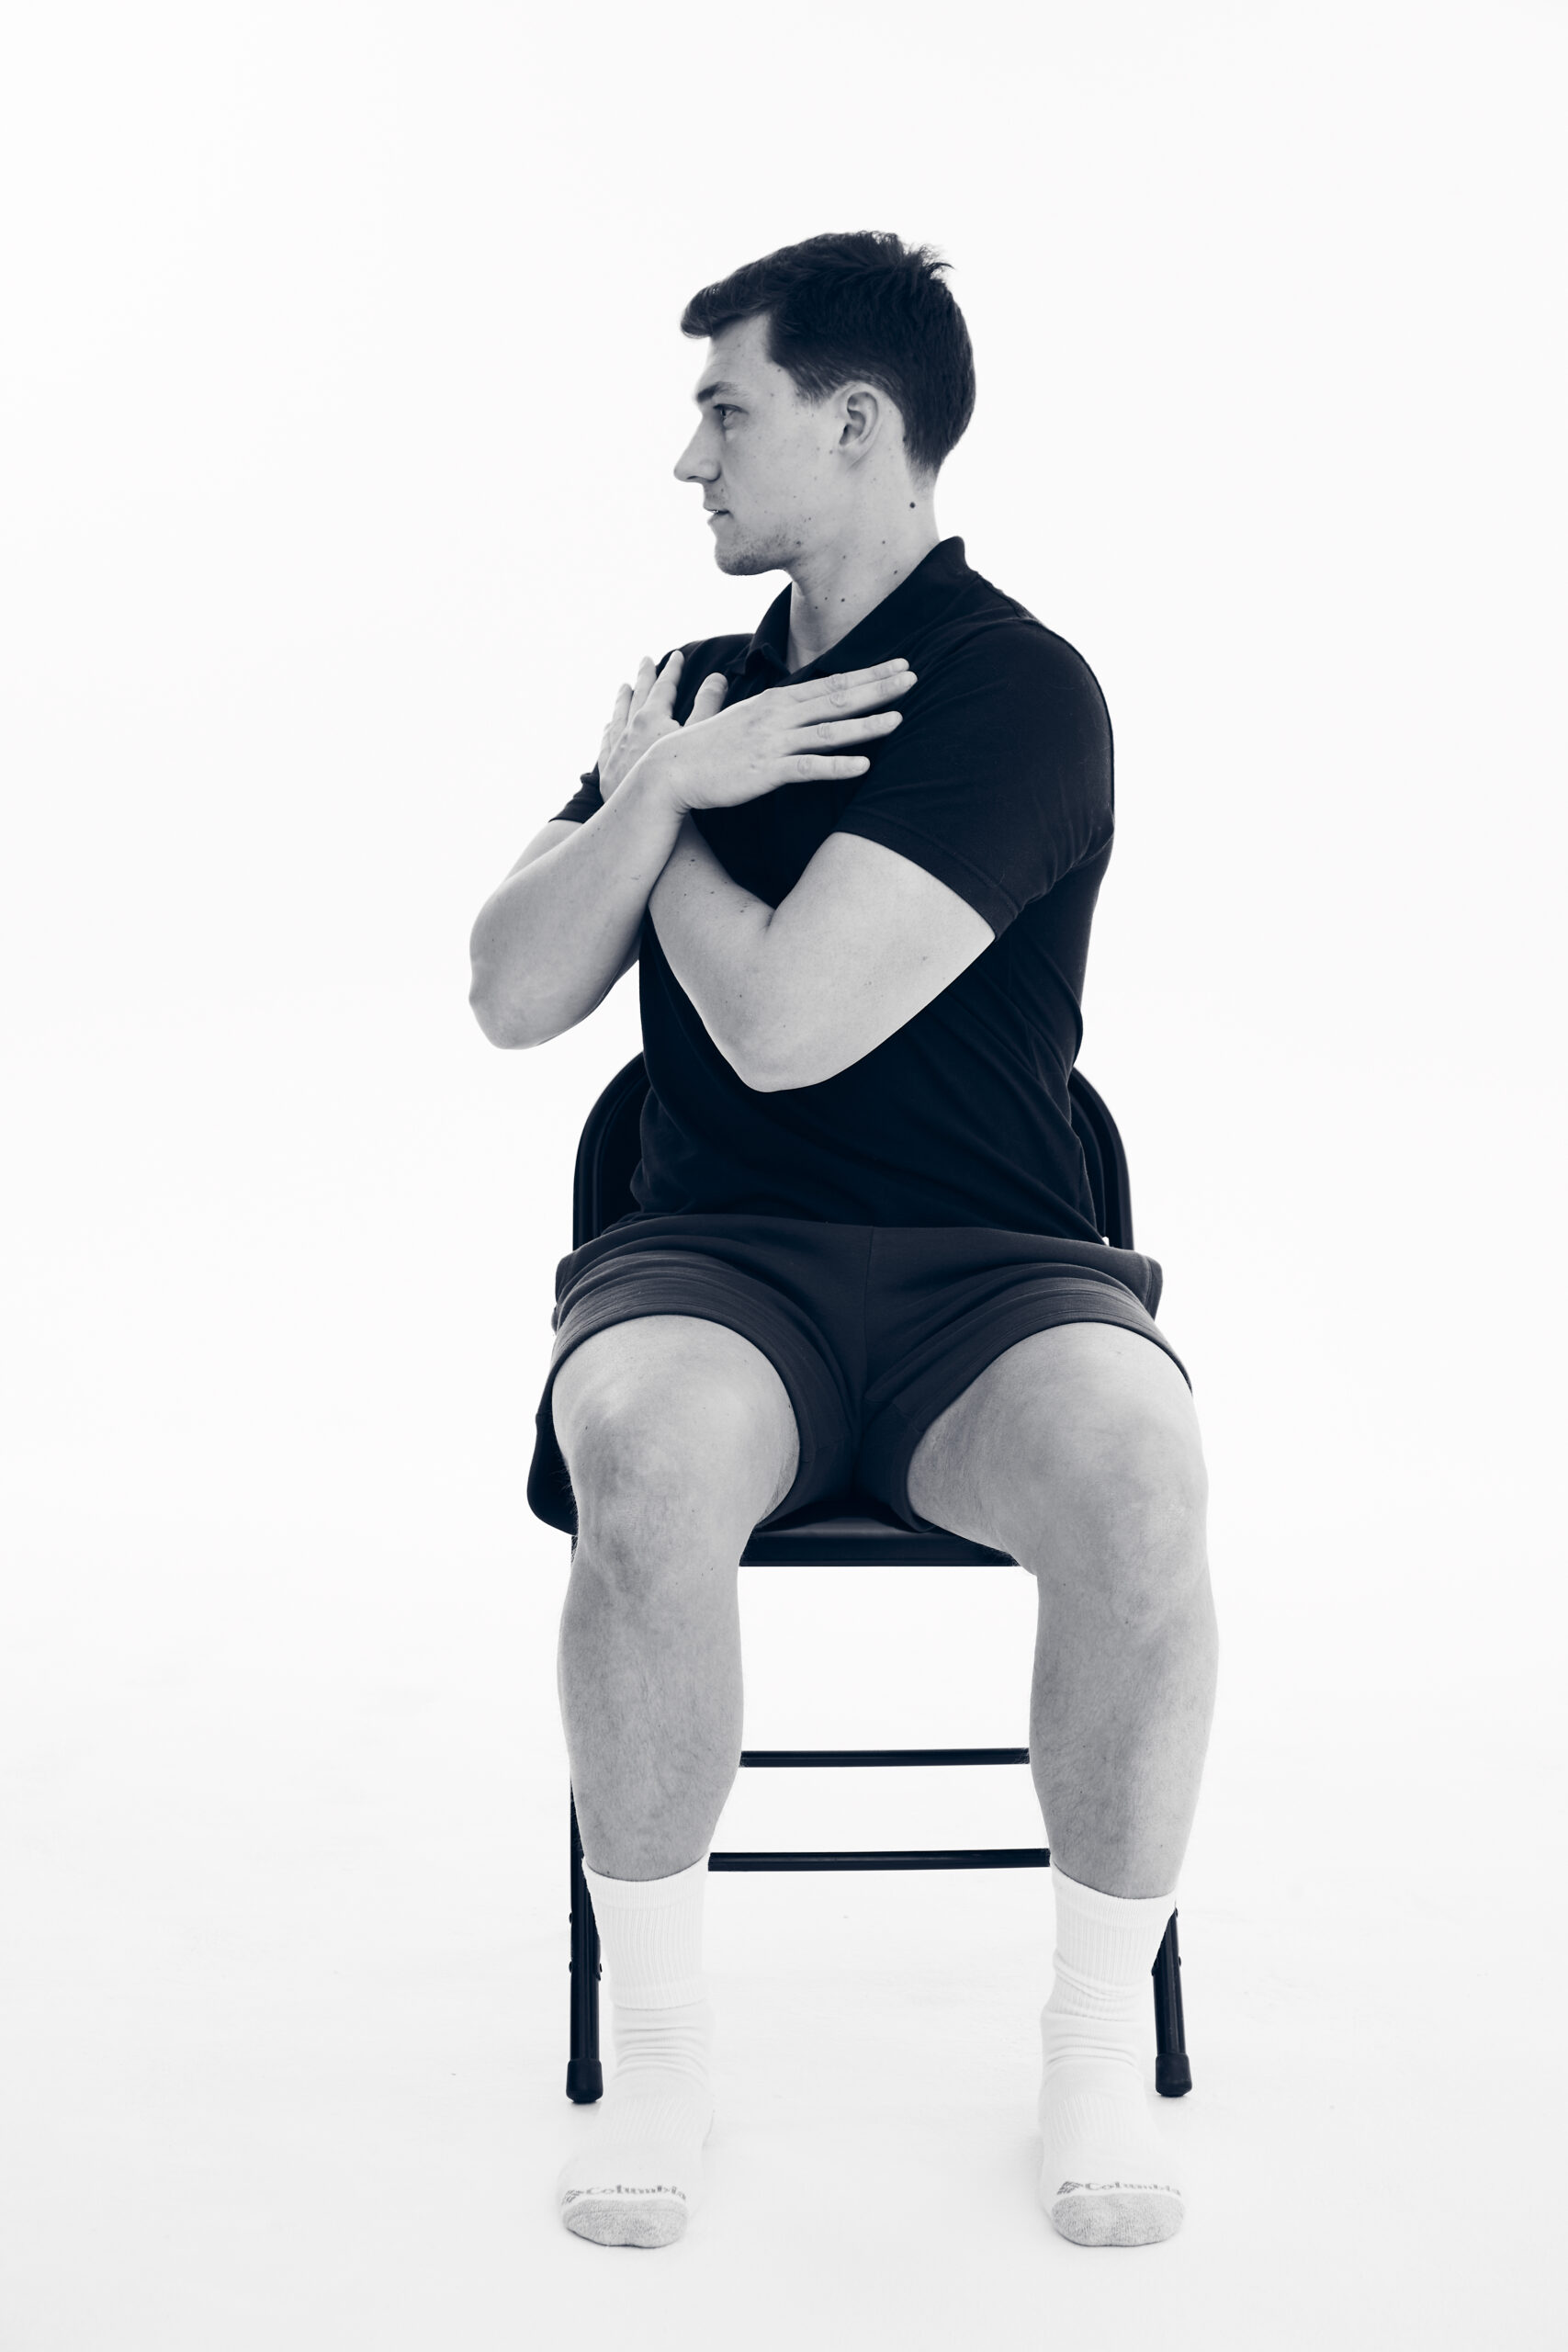
2. Slowly and carefully turn your upper body to the right.
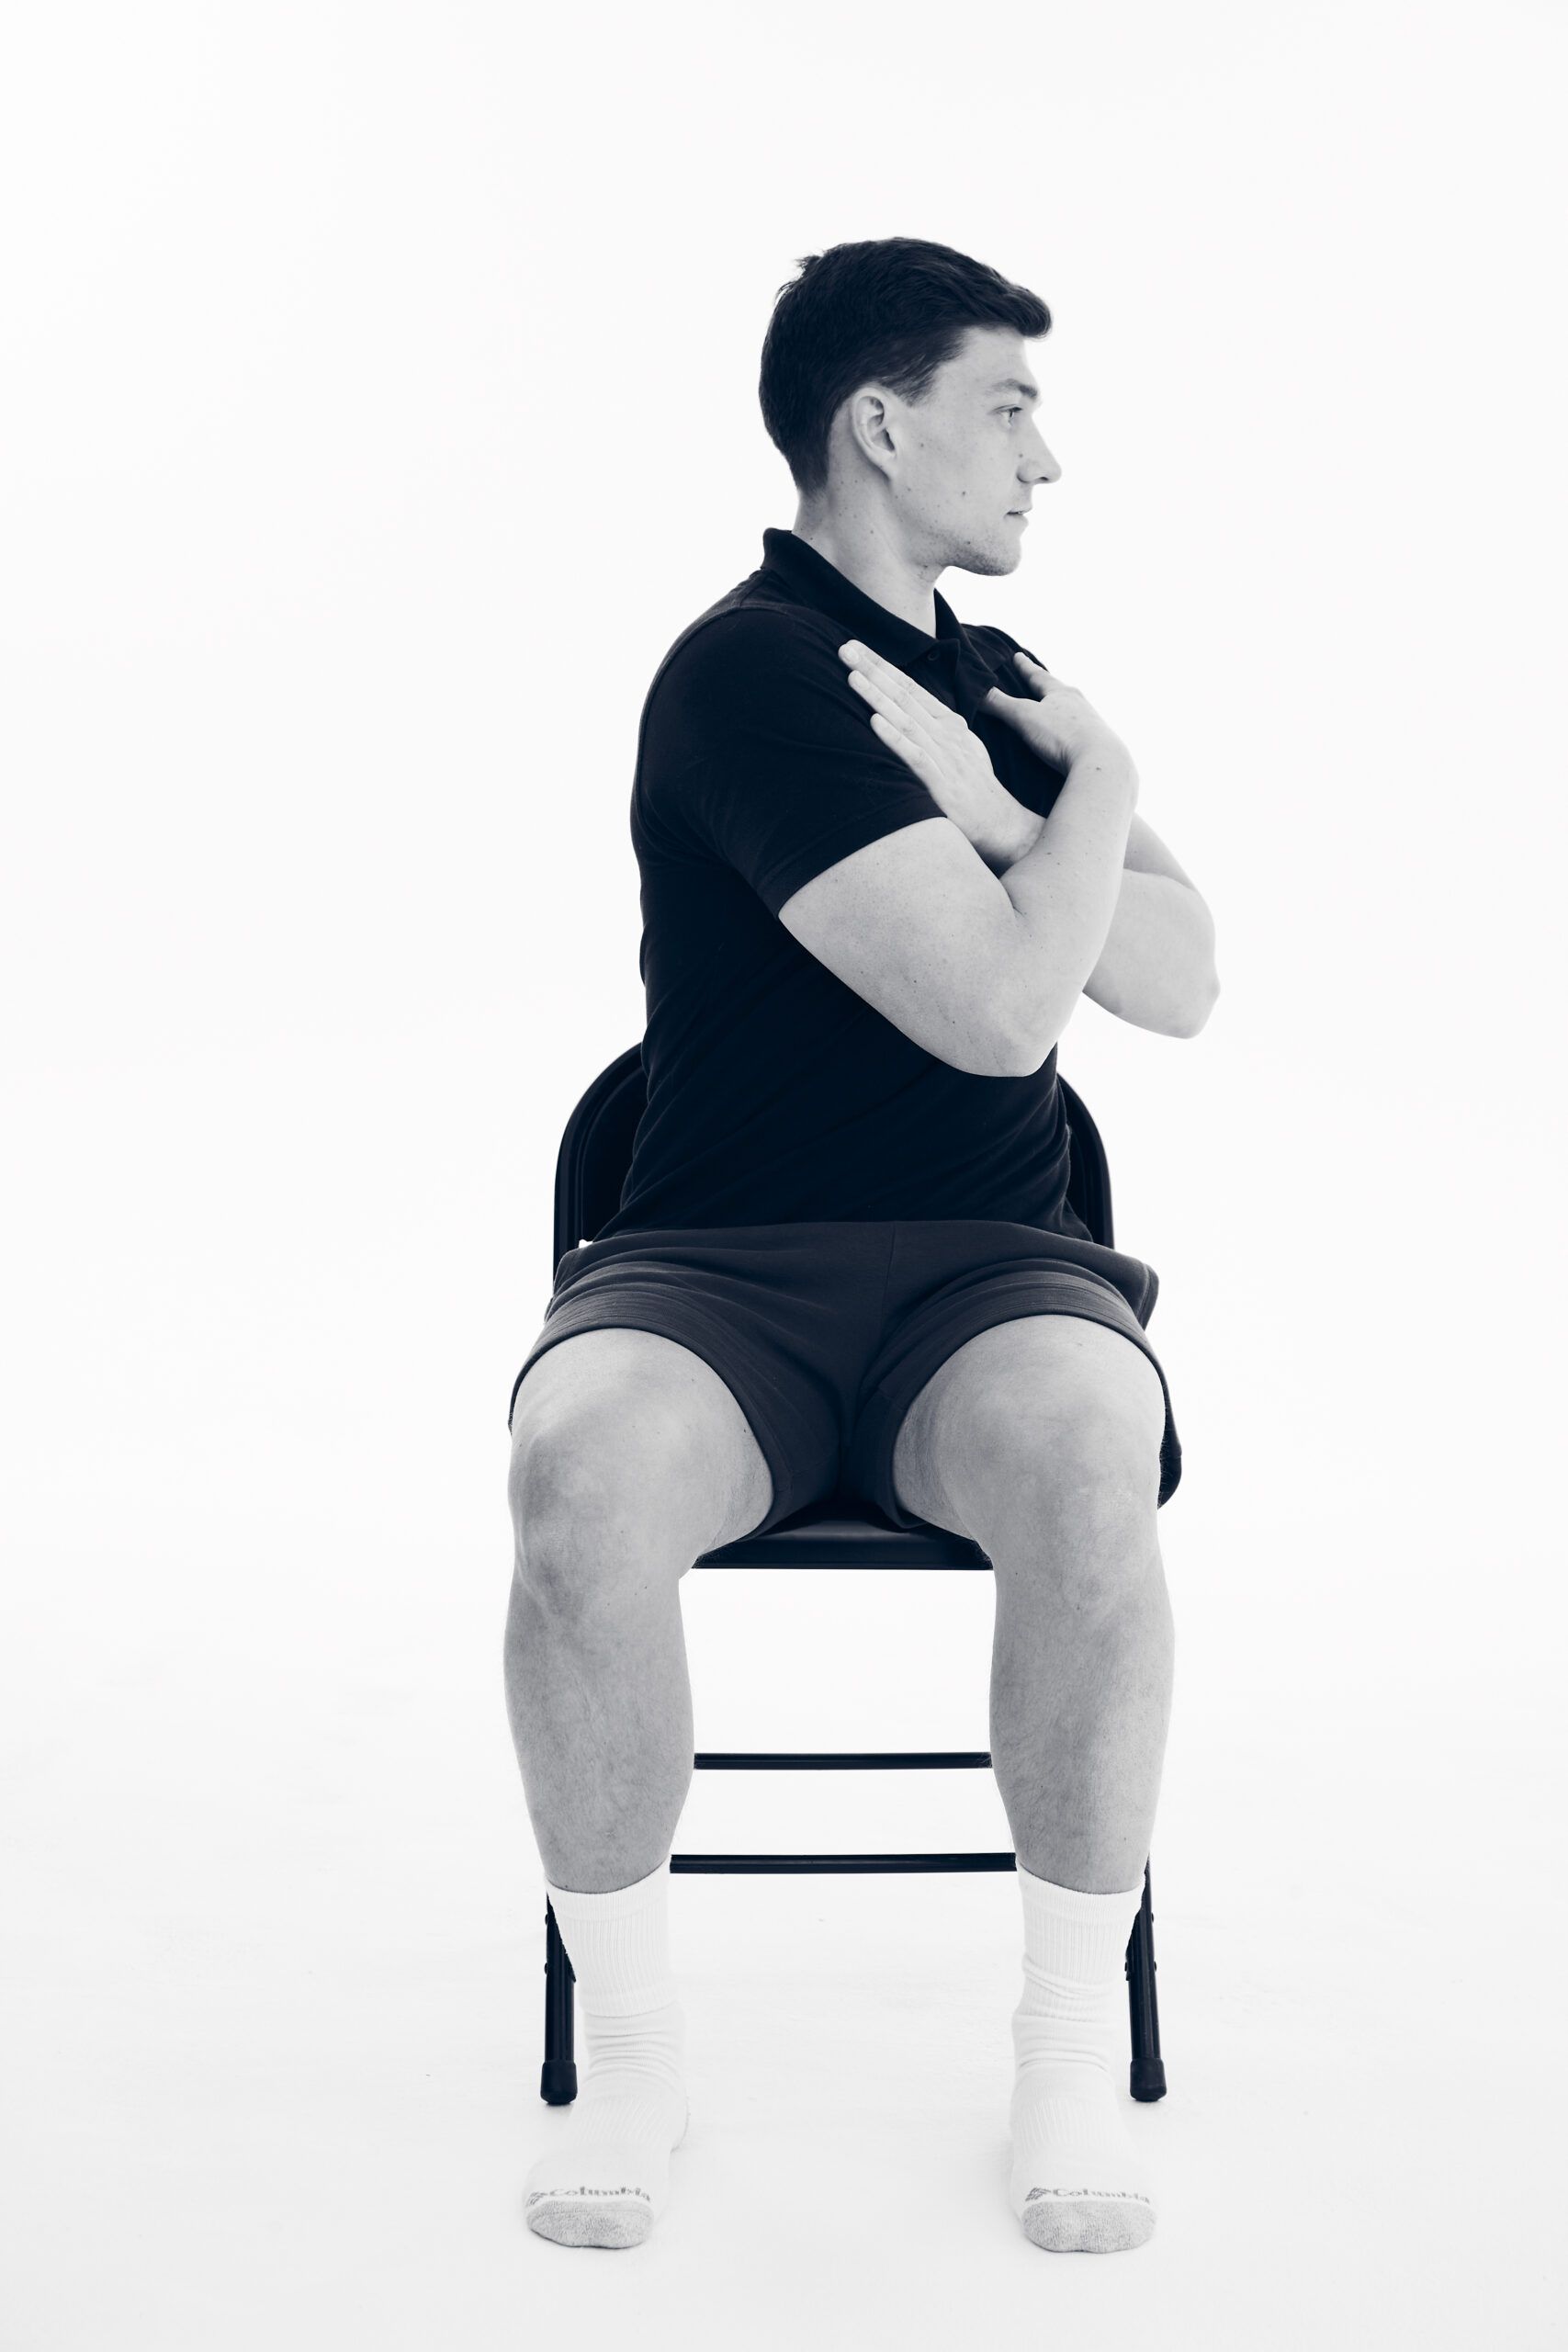
3. Then, still moving slowly and carefully, turn to the left. Rotate right and left 10 times in a row, three times per day.
Here’s a gentle approach that can usually help with neck pain and stiffness. It works especially well for people over 50, as the root cause of their neck pain is often something we call a “facet joint dysfunction.” That’s a fancy term for the joints in the neck not moving as they should.
There are seven bones in your neck, and the way they work is quite intricate. They all move in a synchronized way, articulating with one another via seven joints on each side of the neck and powered by the surrounding muscles.
If, for some reason, one of the 14 joints becomes stiff or the muscles that support movement become imbalanced, a facet joint dysfunction can occur.
I like to picture this as a poorly fitted cupboard door, with the hinging mechanism not properly working. This makes it difficult to use the joint as it was designed and can make the neck feel stiff and painful.
Another possible issue is a muscle spasm, which can arise from the same cause. If there’s a problem with movement, the body senses it and goes on red alert. The way your body then acts to protect you from harm is to tighten up and send the muscles into spasm. The spasm is a signal from the body that says, “Don’t move, it’s not safe!”
On the surface, this might seem like a stupid response, but it’s actually very clever. Your brain can’t differentiate between a genuine risk of harm and a false one. It can’t be sure you aren’t about to suffer an injury, so it takes away the risk by restricting your movement.
So, if you haven’t damaged anything but your neck is still stiff and sore, how are we supposed to fix it? The answer is we must show the body it’s safe to move again, and the towel-assisted rotation exercise (see below) will help you do exactly that.
This exercise is a type of mobilization that uses an external force (the towel) to help the stiff facet joints move as they were designed to do, returning full range of motion and easing stiffness.
It also helps to relieve the symptoms of a muscle spasm by calming the nervous system in the affected area, allowing more freedom of movement and less pain.
The towel-assisted rotation exercise
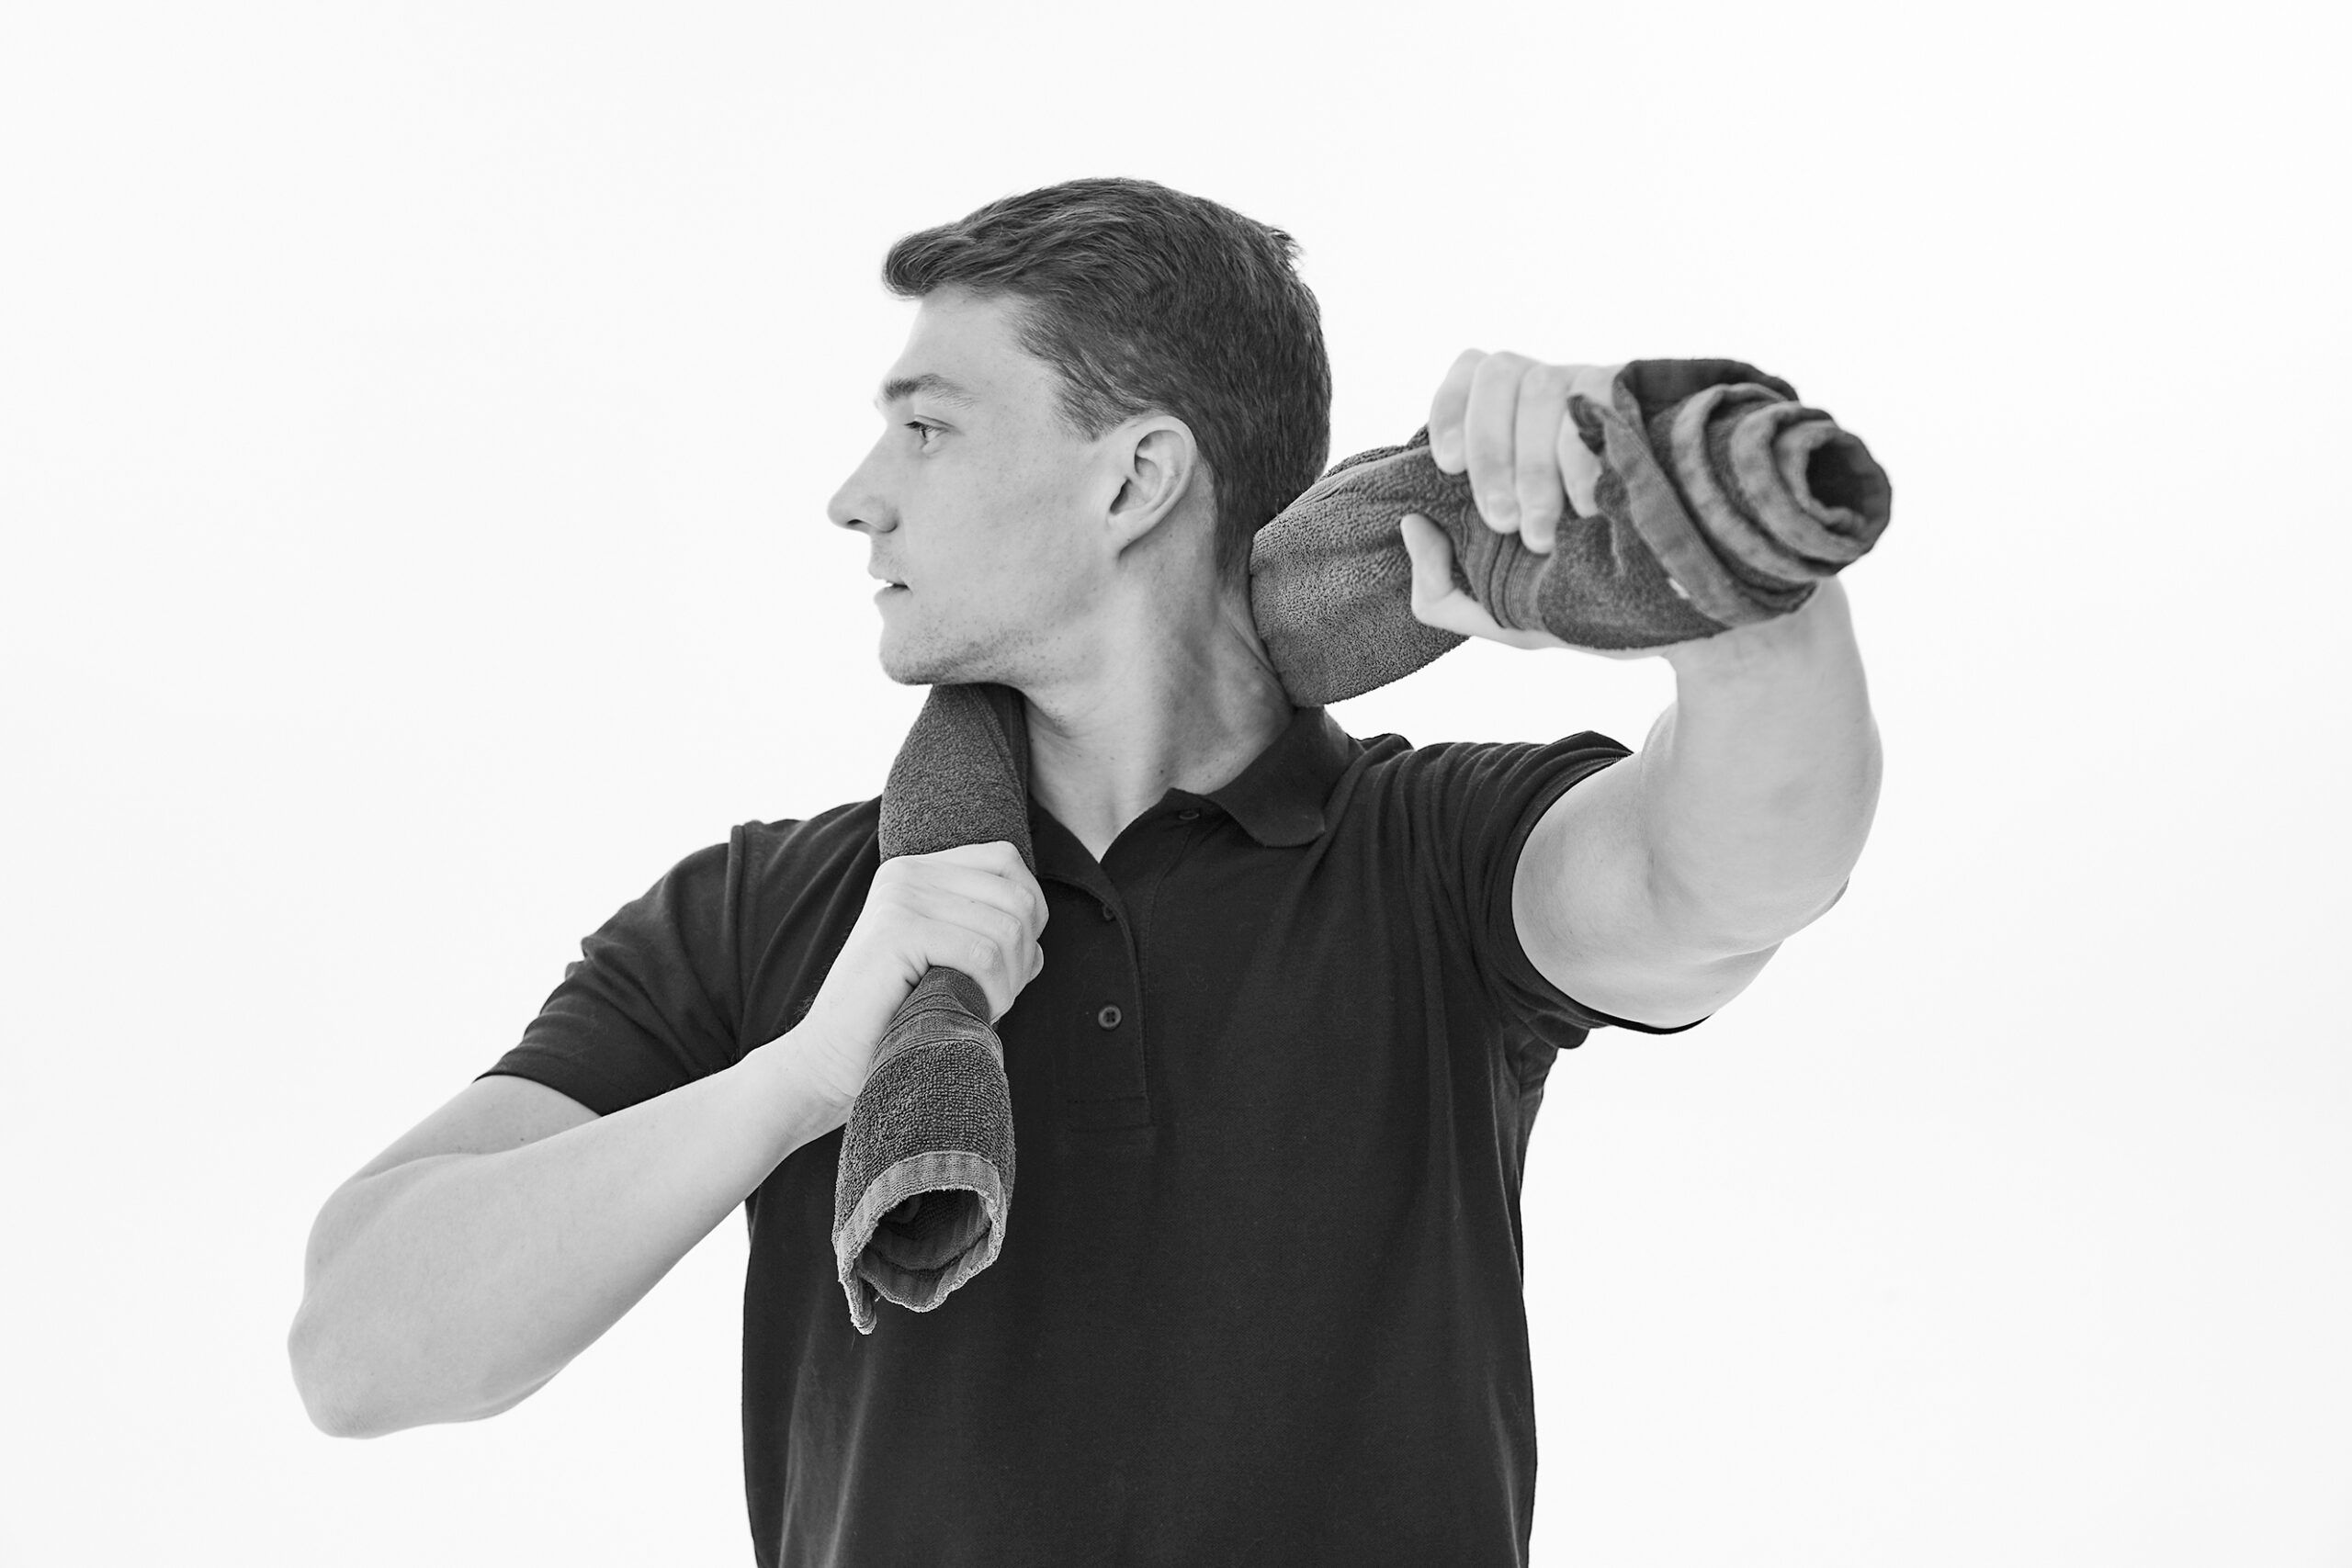
1. Start by rolling a hand towel lengthwise into a band. Place the band around the back of your neck, just at the point where the head meets the neck. Pull firmly forward, adding tension to the towel.
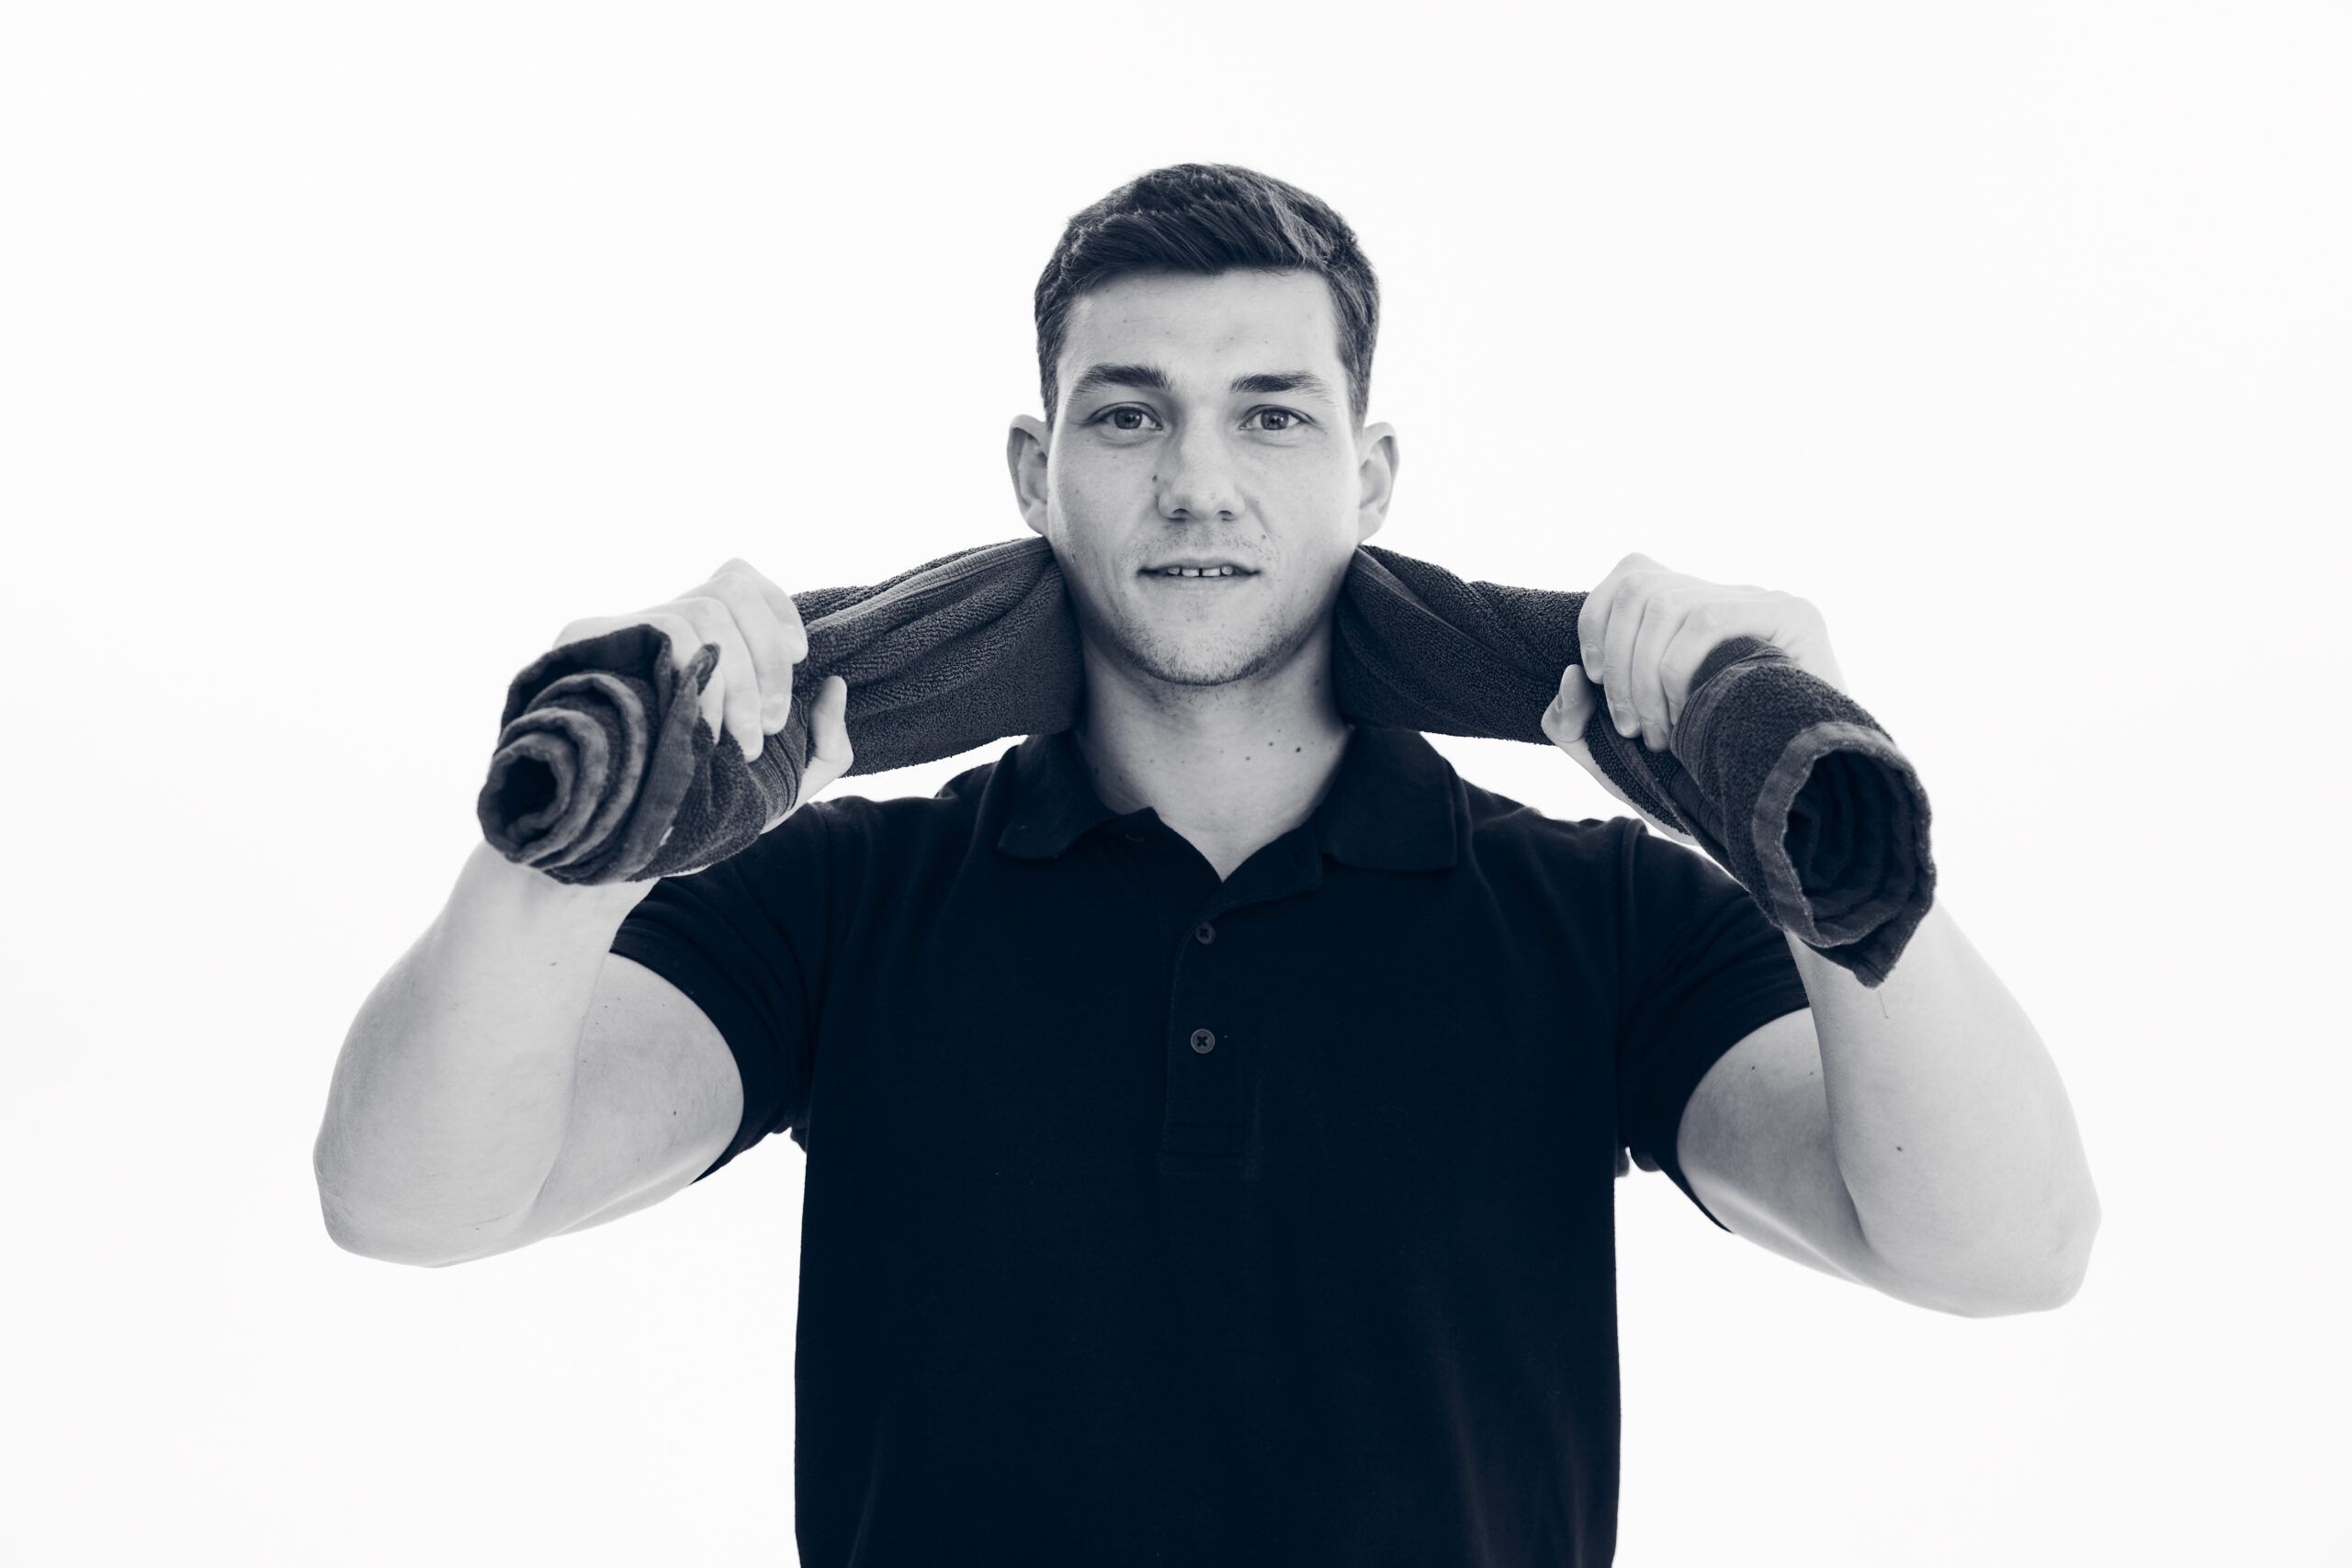
2. Keeping the tension on the towel throughout, turn your head to the left, and as you do so, pull forward with your right hand. You might find you can turn your head farther than you normally can.
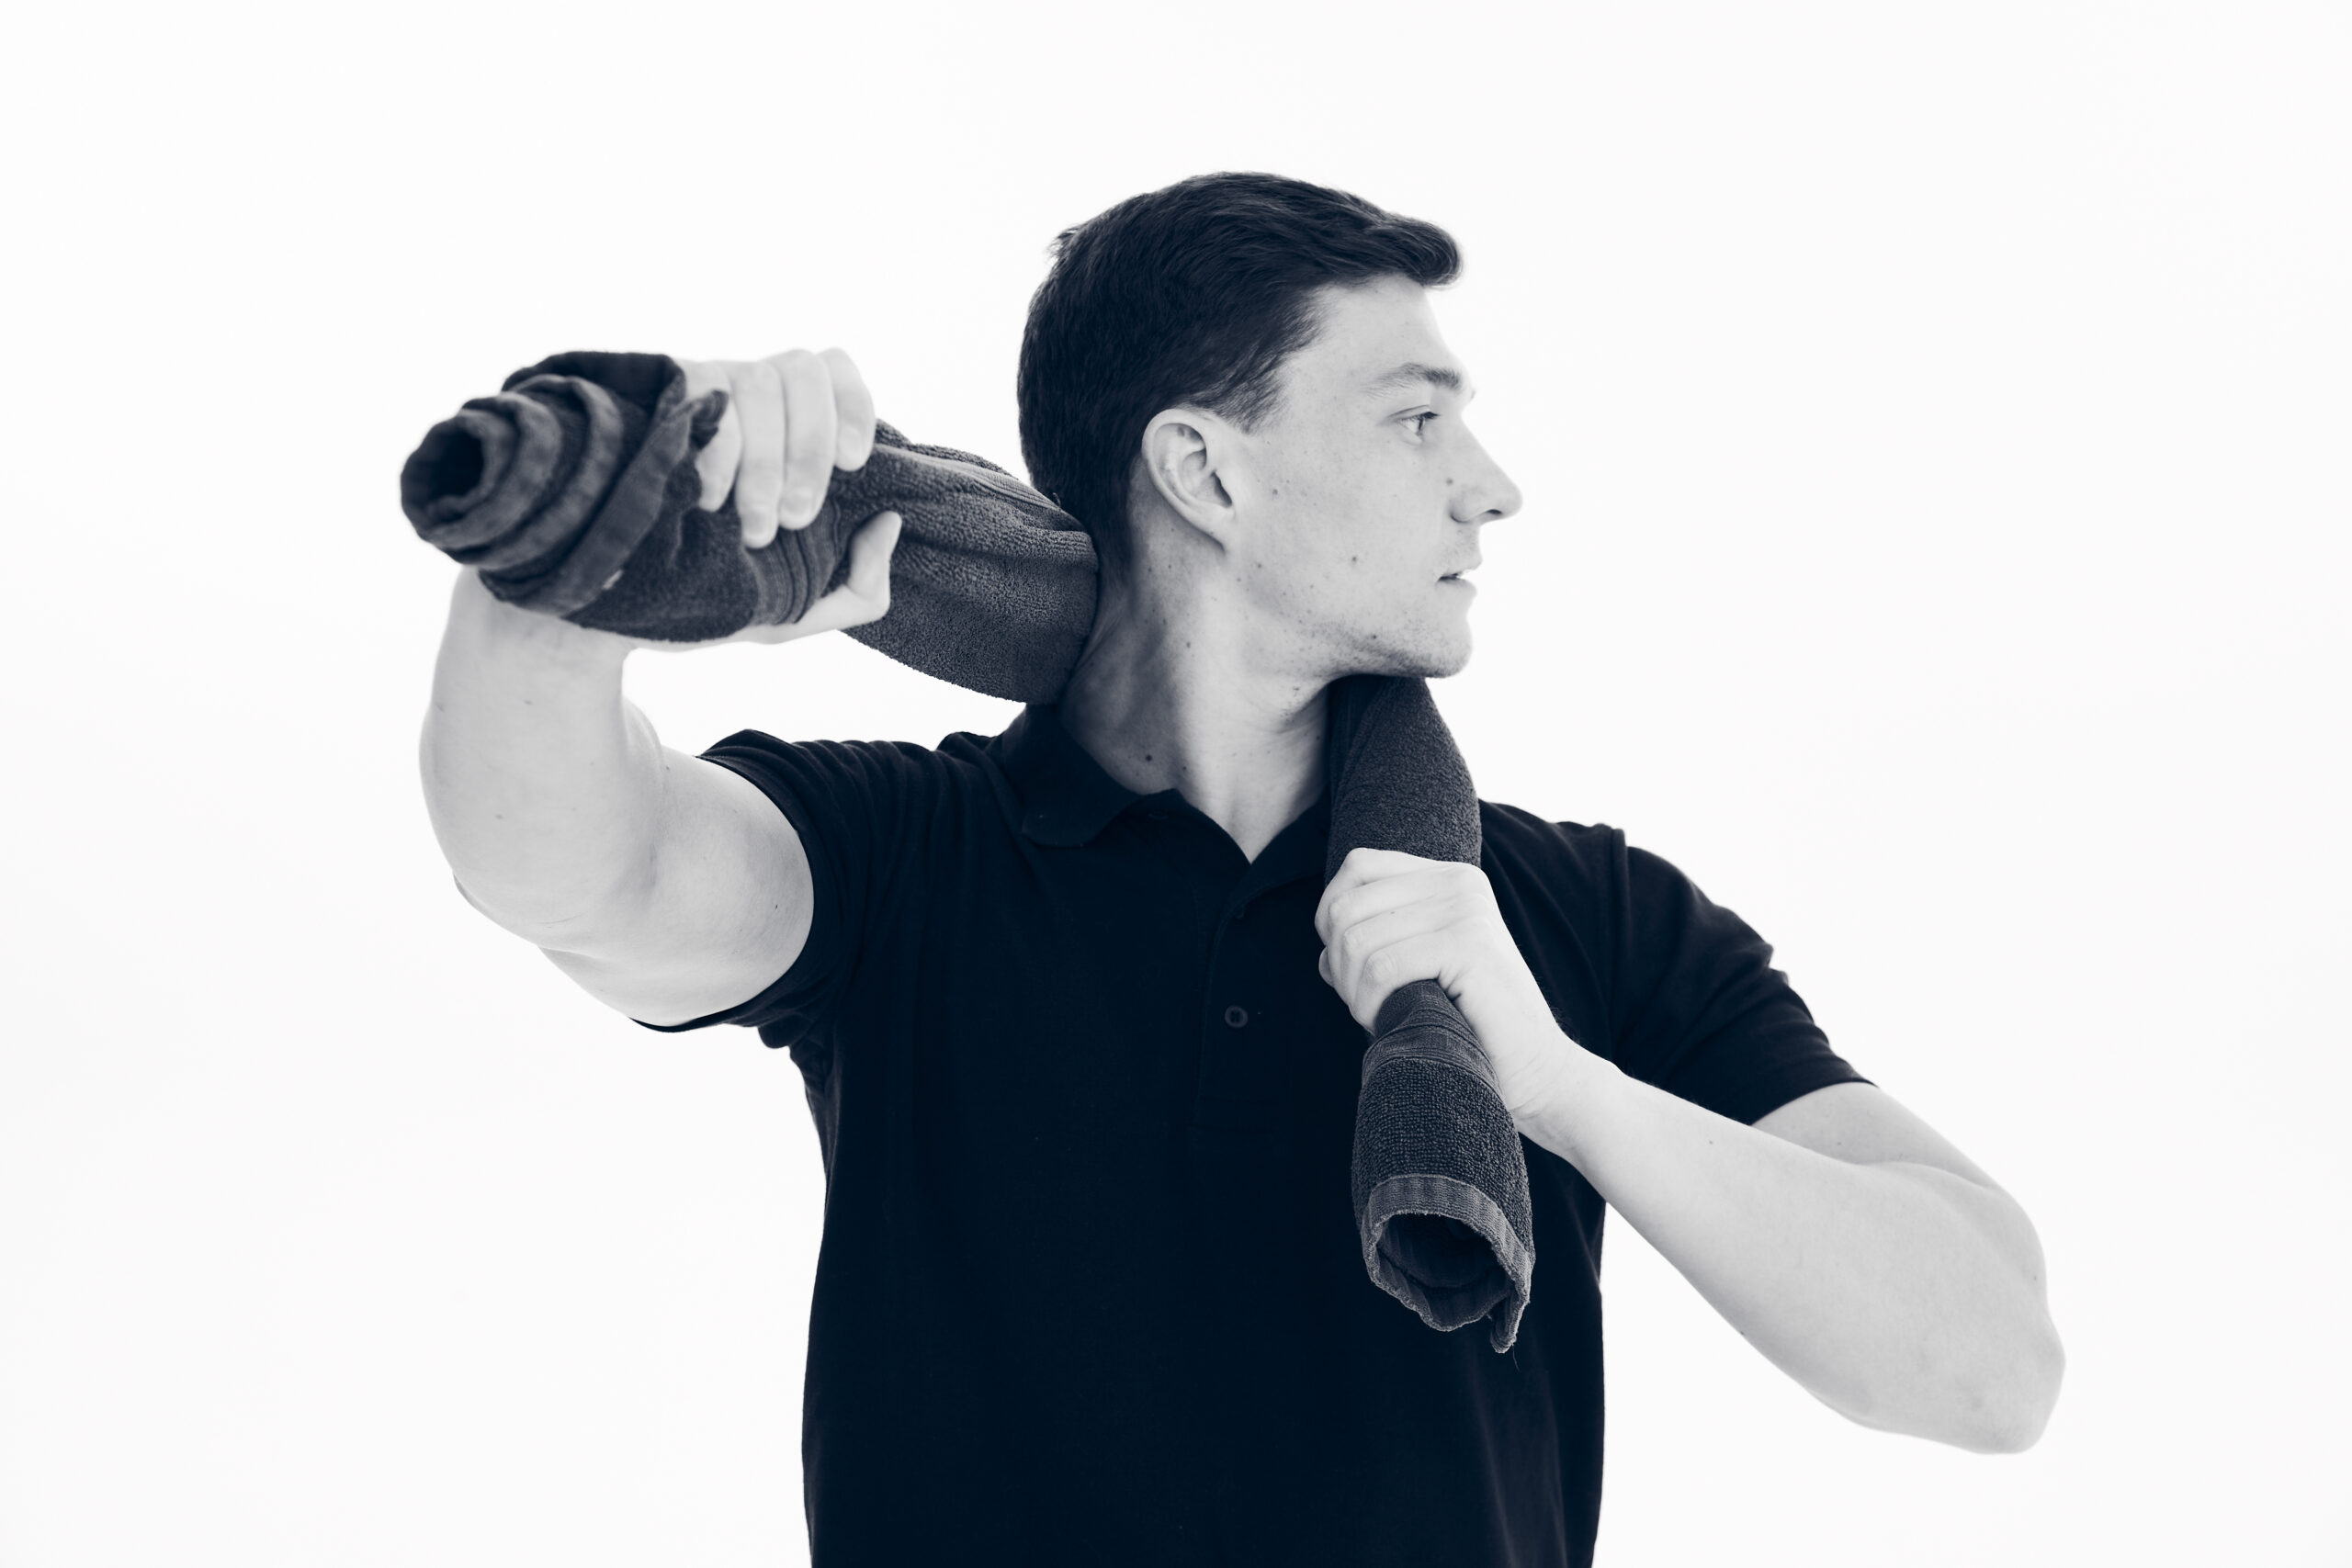
3. Keep the tension on the band as you return to the center. Then repeat, turning to the right but pulling forward with your left hand. Repeat 10 times in each direction, several times a day.
Adapted from Thriving Beyond Fifty: 111 Natural Strategies to Restore Your Mobility, Avoid Surgery and Stay Off Pain Pills for Good by Will Harlow (Hay House, 2024)
Photography © David Cummings
What do you think? Start a conversation over on the... WDDTY Community

Great news! Discounts are available based on your cart total. Check the details below: